
You are browsing the Ableton Live category
Cycling ’74 have released a new object for Max 7 for real-time pitch correction of incoming audio. That highly promising object is called retune~. It looks like Cycling ’74 have also spent time thinking about the struggle of microtonal musicians, because this object supports microtonal scales! You can specify your tuning in cents or ratios, and you can pick a reference pitch in Hz. This is just fantastic to see, and I hope more Max/MSP artists will now be exposed to the world of microtonal scales.
The problem is that intervals of an octave or larger are somehow not supported by retune~. retune~ assumes that your scale will repeat at the perfect octave of 1200 cents (2/1). If you try to add an interval of 2/1 or larger, then you will receive an error message:
Note must be between 1 and 1199 or a relation (1/2, 5/4), value '2/1' ignored.
This will cause difficulty for many because it rules out the use of non-octave tunings. The Bohlen-Pierce scale, the slendro and pelog scales of Indonesia, and Wendy Carlos’ Alpha, Beta & Gamma are amongst the most interesting collections of pitches that you should ever hope to hear.
The documentation for retune~ says that Scala format tuning files (.scl) can be loaded, but I fail to see how this is possible as Scala has support for non-octave scales while retune~ doesn’t. That means that many of the Scala files from my library will cause errors when I load them into the retune~ object. This is patently not Scala support, this is a dodgy hack.
To their credit, Cycling ’74 have gone to great effort to include microtonal tunings in their new retune~ object, and I am truly grateful for that. But it looks they didn’t consult any of the microtonal musicians who would want to make sure that all kinds of microtuning were permitted.
If you are a Max user who would like Cycling ’74 to take some action on this issue, write in to their support team now and also post on their forum. The retune~ object may improve if people make their voices heard.
New instruments are appearing on a regular basis with incomplete support for microtonal scales. Whether it is down to inexperience with microtonal scales, or lack of time/materials/money to do the job properly, it’s sad to see some developers getting it wrong while others get it 100% right.
Please consult with microtonal musicians who work with these ideas on a daily basis! The limitations in your approach will soon become clear as day.
Thankfully some developers are implementing microtonal scale support in the right ways, whether by supporting scl/kbm pairs, MIDI Tuning Standard, or scripts.
If any developers want to reach out to me personally, you can do so via sevish.com/contact and I will do my best to reply by email. You can also join the world’s busiest online microtonal music community at Xenharmonic Alliance II, where hundreds of microtonalists will be willing to provide you with insight into our dark art.
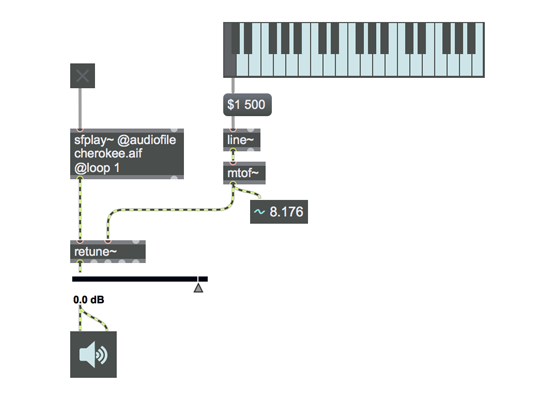
It is possible to make microtonal music in Max/MSP by synthesis using two methods that I find really easy to work with. You can use a coll object to store a frequency for each MIDI note number, or you can use the expr object to convert MIDI note numbers directly into frequencies of any n-tone equal temperament.
The coll method is more appropriate for just intonation, unequal or empirical scales, whereas the expr method is nice if you want to play equal temperaments or harmonic series based scales and you want to allow the user to adjust the tuning on-the-fly.
To see this in action, download my Max 4 Live instruments where I use both tuning methods.
If you want to use retune~ in Ableton Live, Cycling ’74 have released a pack of Max 4 Live devices to do just that. The pack is called Pitch and Time Machines and the two devices to pay attention to are Autotuna and Microtuner:
Autotuna – A scale-based microtonal auto-tuner that can use Scala files [lol]. This device uses the retune~ object to tune the audio to a given scale. Scales can be either entered by hand, or loaded from Scala files [lol] – a file format for musical tunings that is a standard for exchange of scales. Learn more about Scala.
Microtuner – A table-based microtonal auto-tuner that can use Scala files [lol]. This device is similar to the Autotuna example device, except that scales are entered using a graphic function whose shape can be curved, thus providing some unexpected pitch scales.
Thanks to Todd Harrop for his research and Joakim Bang Larsen for bringing retune~ to my attention.
Here’s a tutorial to help you make microtonal music in Ableton Live. We’re going to mod Ableton Live’s piano roll to play 22-tone equal temperament (aka 22-edo). You can apply this technique to other piano roll designs, with some limitations discussed later. Abletonalists unite!
First I should provide some context as to why this tutorial will be so useful. Check out this mindblowing M-Audio Keystation 88 with the keys rearranged to play 22-edo. It was a little project of William Lynch‘s a few months ago.
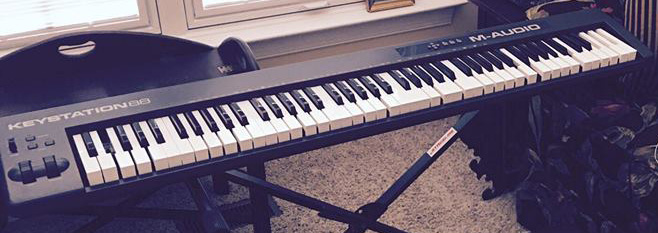
This keyboard layout is Steve Rezsutek’s design as discussed in Paul Erlich’s paper Tuning, Tonality, and Twenty-Two-Tone Temperament.
There are gaps between some white keys because white keys actually come in different shapes and sizes, making things look a little messy when rearranged. You also need extra black keys to make this work, so you can see a few missing at the upper end of the keyboard. Spare keys can be found on second-hand broken keyboards or bought as replacement from the manufacturer. Soon we’ll be able to 3D print each key for any given piano roll layout (this could be a great project for a music technology student). Obviously this is all very DIY, but at this point in time nobody is mass producing microtonal instruments. Everybody in the microtonal scene right now hacks and invents their own unique stuff.
Truth be told, I’m planning to use some of my Rhythm and Xen album sales to buy a new keyboard and make one of these for myself.
The goal of this tutorial is to recreate Rezsutek’s keyboard layout in the Ableton Live piano roll. Erlich suggests to remove all the E notes, so that you have something that looks like below:

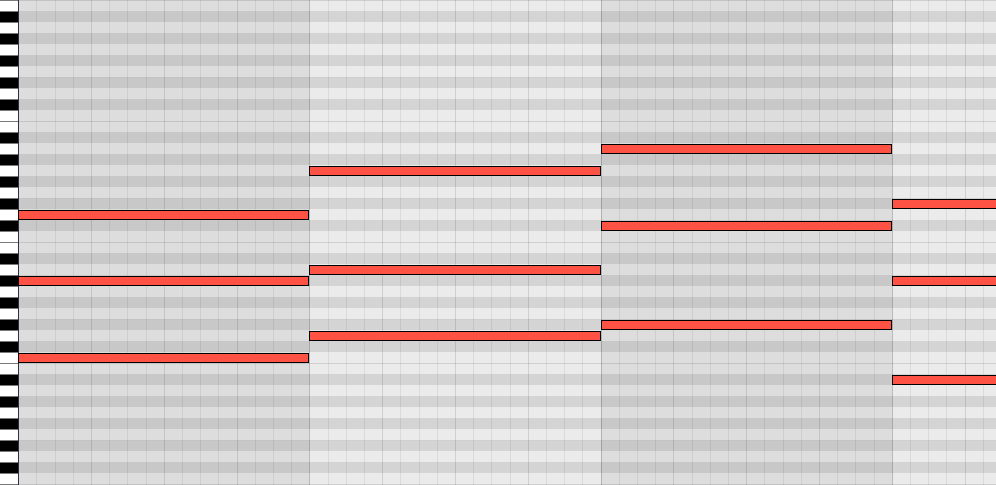
Not only will this tutorial show you how to make a dope 22-note piano roll like above, but you’ll also be able to actually HEAR and PLAY music in this novel tuning system. It’s a beautiful system that includes such wonderful intervals as the subminor third, the 7th and 11th harmonics, and near-quartertones, plus a variety of rich chords, progressions and comma pumps.
This technique isn’t specific to 22-edo; you can adapt the method for other tunings too.
To make this happen, we will be using the piano roll ‘Fold’ function, as well as taking a few other steps to make everything sound correct.
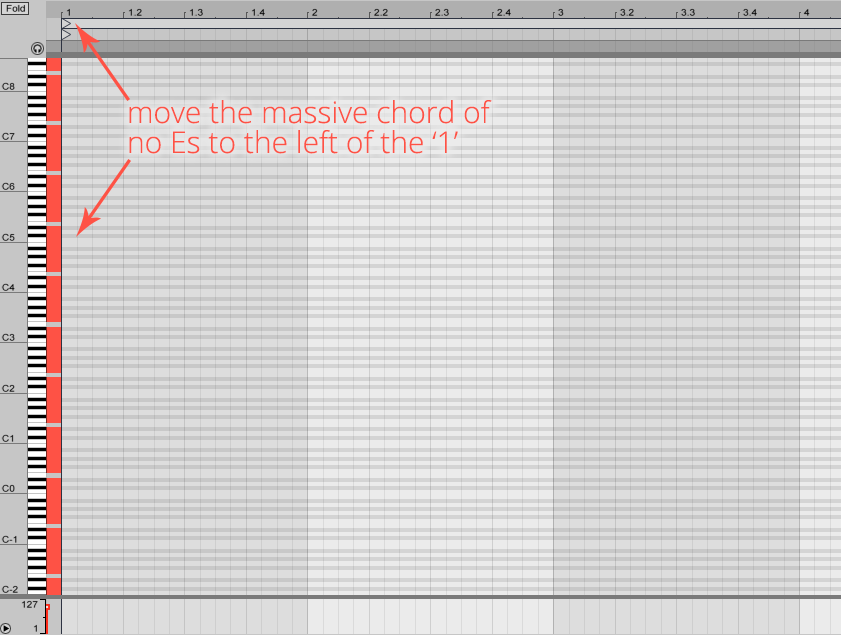
This is the easiest part, and you might know this trick already if you’re knowledgeable with Ableton Live. We will create a MIDI clip that has one massive chord containing every note except for all the Es. Then we will enable Fold so that the Es disappear from the piano roll. So let’s look at it step by step:
Create yourself a new MIDI clip and make sure that Fold is disabled. Then start building up a chord containing all the notes except for the Es:
It’s easiest to work up from the bottom. Once you have made one octave you can copy and paste to fill in the rest of the notes.

Once you have added all the notes from C-2 to G8 you can move the whole chord to the left, so that it is outside of the range of the clip. This way, you won’t hear an almighty cluster of pain when you play the clip.
Ctrl+A to select all the notes in the chord, then tap 0 to disable all the notes. This will protect you from hearing these notes if you have MIDI Editor Preview enabled.
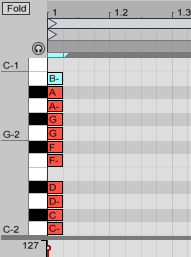
Then click on the Fold button to enable it. All of the Es will disappear from the piano roll.

Just ignore the note names (C4, C#4 etc.) because they don’t have any relation to 22-edo.
Now we have our custom piano roll layout set up in Ableton Live, but that doesn’t mean that the notes will play a 22-edo scale. You can’t just drop Operator on to the MIDI track and expect everything to be tuned to 22-edo automatically. At this point, you should make sure that you have some kind of MIDI instrument or VST/AU plugin that supports microtonal scales.
I will use Scala to design a tuning file with 24 notes in total. Each note will be tuned to a note from 22-edo, and 2 of the notes will be duplicates that fill in the missing Es.
First we type ‘equal 22’ into scala and hit enter. This generates the scale. Then we click on ‘Edit’ to see all of the notes that were generated. By Scala tuning standards, 1/1 will fall on middle C at ~261 Hz unless a keyboard mapping is specified. So we can assume 1/1 is C, and therefore the notes 218.18182 and 818.18182 should be duplicated to fill in the missing Es.
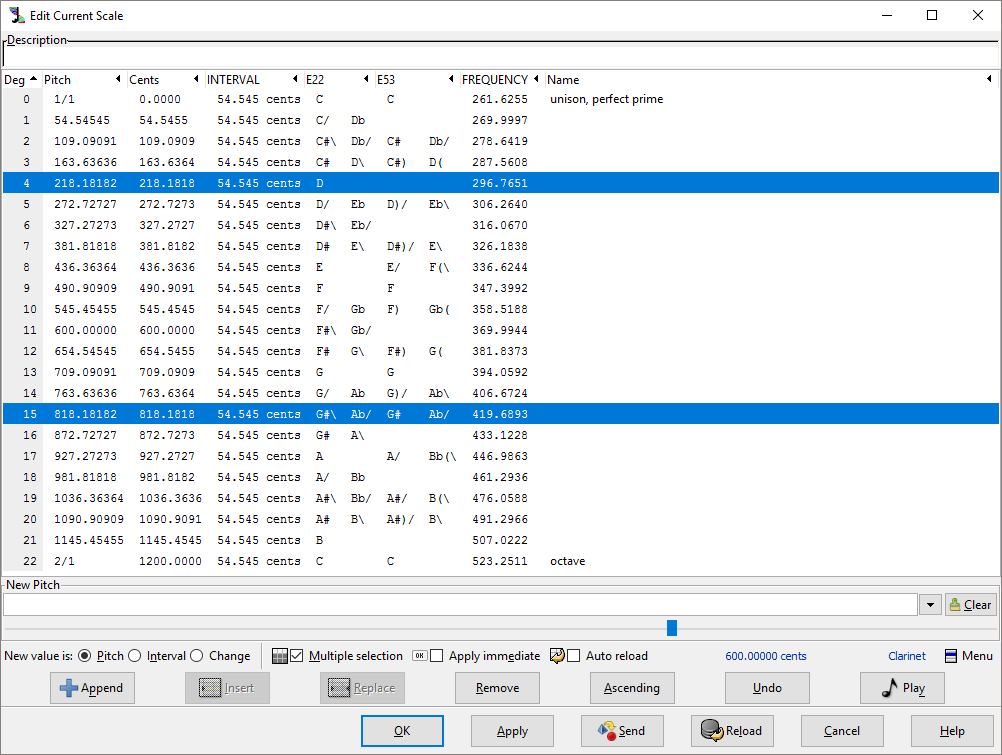
You can just select 218.18182 and 818.18182, then Ctrl+C and Ctrl+V to duplicate them. Finally, click on the ‘Ascending’ button to make sure that all the pitches are in the correct order. Click OK when done, and save your progress.
Or if you’re too lazy for all of this, save the below text as a .scl file:
! 22-edo-no-Es.scl
!
22-EDO with no Es
 24
!
 54.54545
 109.09091
 163.63636
 218.18182
 218.18182
 272.72727
 327.27273
 381.81818
 436.36364
 490.90909
 545.45455
 600.00000
 654.54545
 709.09091
 763.63636
 818.18182
 818.18182
 872.72727
 927.27273
 981.81818
 1036.36364
 1090.90909
 1145.45455
 2/1
All that’s left is to export this scale for the synth you’re using. You can read your synth’s manual to determine which format of tuning file it needs. Then export the correct format file using Scala. Watch my YouTube video tutorial below to find out how to export various kinds of microtonal tuning files with Scala.

Head back to Ableton Live as quick as possible, then drop an awesome VST instrument on to the MIDI channel you used earlier. Load the tuning file you created into the VST, then jammmmmm. The setup is finished, so start writing!
Remember that octave transpose works differently now because your scale actually spans (what Live thinks of as) 2 octaves:
Ctrl+↑ to move a note up by a tritone.
Ctrl+↑↑ to move a note up by an octave.
Ctrl+↓ to move a note down by a tritone.
Ctrl+↓↓ to move a note down by an octave.
Make sure to read Paul Erlich’s paper Tuning, Tonality, and Twenty-Two-Tone Temperament for more insight into the musical possibilities of this scale.
Update: I made an example project with one MIDI clip already set up for you. In the project folder you’ll also find tuning files in 3 different formats.
I suspect that the Fold method will work easily for any scale less than 12 notes. It will also work for any even-numbered scale with 12 to 24 notes in total, as long as the pattern of white and black notes repeats every 12 MIDI notes. This is because the “octave transpose” function (Ctrl+↑ or Ctrl+↓) in Ableton Live’s piano roll transposes by 12 notes and ignores folding. So an asymmetric piano roll layout will be broken by octave transposition.
There’s a long list of 22-tone music on the Xenharmonic Wiki. And here’s a song I created in 22-tone equal temperament back in 2010:
I’ve written before about how DAWs don’t often allow a custom piano roll designed for microtonal musicians. If you’re using a scale with more or less than 12 notes, then the piano roll doesn’t match up with what you hear from the synth. As an Ableton Live user, I wanted to know what workarounds I could use right NOW in order to make composing microtonal music a little easier.
My goal: display custom note names for every note on the piano roll!
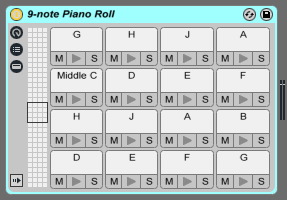
Using a Drum Rack, it’s possible to change the note names displayed in the piano roll. Load up one of my sample Drum Racks (download here) and add it to an empty MIDI track. Create a MIDI clip on that track and make sure that ‘Fold’ is enabled on the piano roll. You should see something like below:
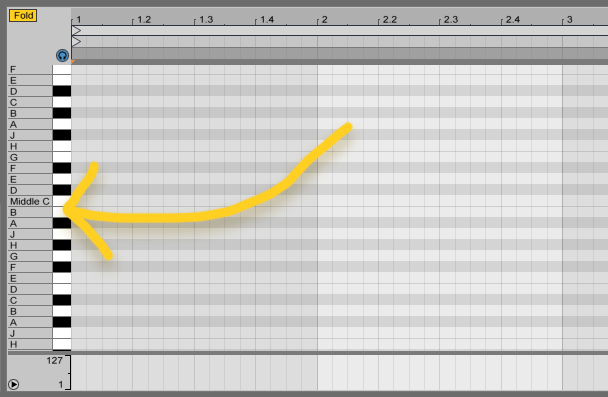
The example above shows a 9-note scale using the letters A B C D E F G H J.
Then, you must load your instrument on a new MIDI track, and connect the MIDI input of that track to the Drum Rack track (pre FX).
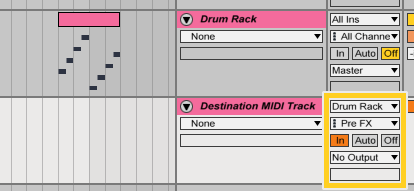
Once this routing is set up, you can compose in the piano roll of the Drum Rack track. The note names here can be a useful guide when you’re composing with microtonal scales.
Making these Drum Racks is time consuming because you have to name all 128 notes individually. I have done the hard work for you and made a pack of Drum Rack presets that you can drop into your project. Each one assumes that MIDI note 60 is middle C (this is the default for Scala keyboard mappings).
5 note scale: C, D, E, A, B
6 note scale: C, D, E, F, A, B
7 note scale: C, D, E, F, G, A, B
8 note scale: C, D, E, F, G, H, A, B
9 note scale: C, D, E, F, G, H, J, A, B
10 note scale: C, C#, D, D#, E, E#, A, A#, B, B#
11 note scale: C, C#, D, D#, E, F, G, G#, A, A#, B
12 note scale: lol
13 note scale: C, C#, D, D#, E, F, F#, G, G#, A, A#, B, B#
14 note scale: C, C#, D, D#, E, E#, F, F#, G, G#, A, A#, B, B#
17 note scale: C, Db, C#, D, Eb, D#, E, F, Gb, F#, G, Ab, G#, A, Bb, A#, B
19 note scale: C, C#, Db, D, D#, Eb, E, E#, F, F#, Gb, G, G#, Ab, A, A#, Bb, B, B#
22 note scale: C, C#, D, D#, E, E#, F, F#, G, G#, Hb, H, H#, J, J#, K, K#, A, A#, B, B#, Cb
>> Download the pack of Drum Racks (.zip) <<
The note names that I chose for some of the mappings are somewhat arbitrary. But there is some method to the madness.
The note names for the 5 note through to the 9 note mappings just assign a unique letter for each note. The 10 note mapping has 5 naturals and 5 sharps. The 11 note mapping is similar to the standard 12 note mapping, without F#. The 13 note mapping is similar to the standard 12 note mapping, but B# is added. The 14 note mapping uses 7 naturals and 7 sharps.
The 17 note mapping is based on a circle of fifths. C# is actually higher than Db because the fifth is tuned sharp (i.e. it’s a superpythagorean tuning).
The 19 note mapping is also based on a circle of fifths.
The 22 note mapping is designed for 22-EDO, so that the naturals give you a symmetrical decatonic scale such as those described in Paul Erlich’s paper Tuning, Tonality, and 22-Tone Temperament.
There seems to be a performance drop if you have too many of these Drum Racks active. I’m using a 4 year old laptop, and editing the Drum Racks become tedious once there were about 4 of them active.
But the main problem is that you can’t change the colour of the notes, so you’re still stuck with the 7-white 5-black Halberstadt layout. Try to look at the note names and ignore the note colours.
It would be a great help if Ableton would implement some kind of key colour mapping feature in the Live’s piano roll. The only way this could happen is for users to actively ask for it. You should go and make the feature request now at Ableton’s forums and beta website.
My workflow for making microtonal music in Live
Why DAW developers should design a better piano roll
VSTs for playing and composing microtonal music
Microtonal music in Bitwig Studio
Just wanted to share a super simple Ableton Live effects rack. Despite its simplicity, this is the rack I use the most (in fact it’s my default rack preset). It’s a stereo pan. Download it.
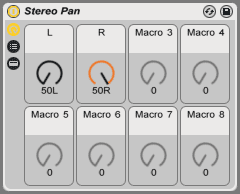
You see, Ableton Live strangely omits stereo panning while other DAWs such as Logic Pro and Pro Tools sensibly include it.
That thing that looks like a pan pot on the channel strip? Yeah that’s a balance control. It doesn’t actually let you manipulate a stereo signal, it just makes the left or right channel quieter. Stereo panning is different; it allows you to pan the left and right channel independently to any part of the stereo image.
I use this effects rack to tightly control the stereo image of my tracks and busses. And I never use Live’s balance control unless it’s on a mono track.
If you’re interested, check out some of my sounds.
This is my answer to the question “Sevish, how do you make your music?”
I won’t discuss my creative process but I’ll explain my workflow and the tools used to get music made. What I like about my workflow is that it works superbly for me.
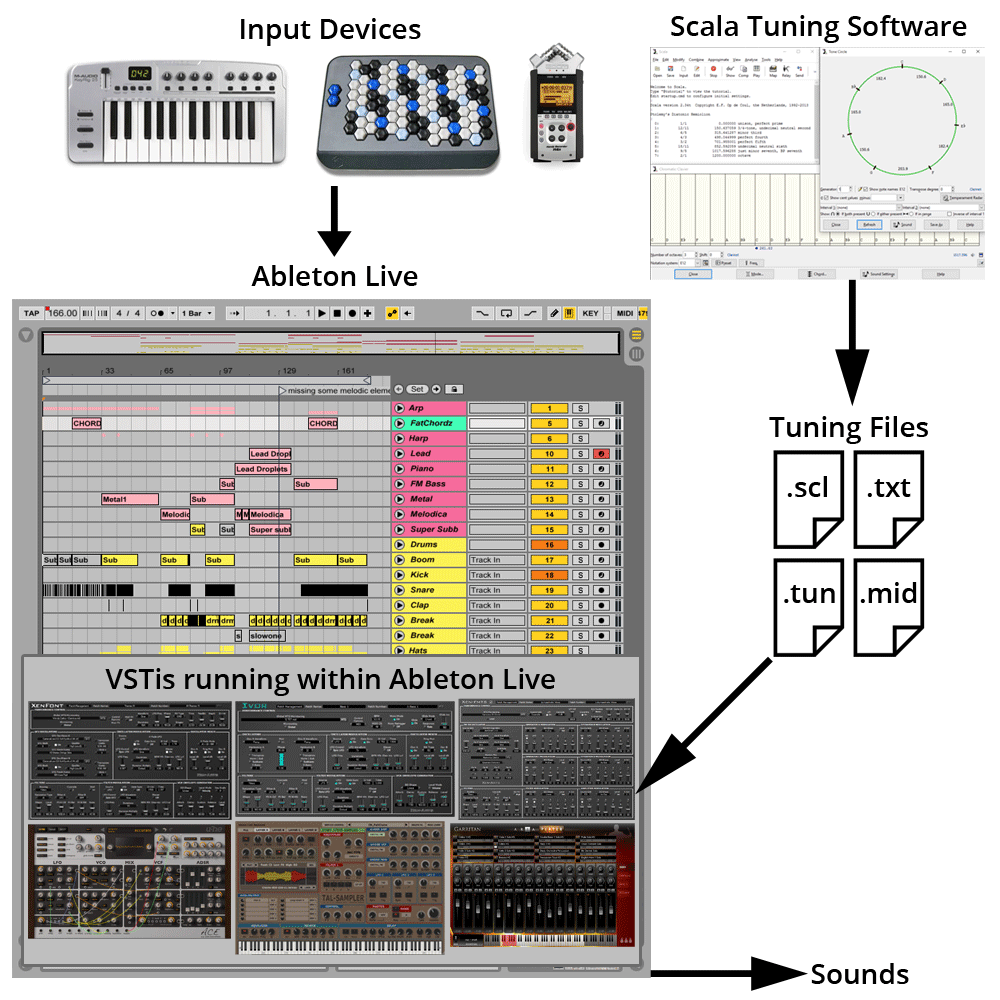
I use Ableton Live to write, record, and mix my music. Within Live, I load VST instruments that have built-in microtonal scale support. I use Scala to produce the tuning files necessary to retune those VSTis. I play the VSTis using my MIDI keyboard, C-Thru AXiS-49, QWERTY keyboard and through mouse input. I also sample recordings that I have made using my Zoom H4n portable recorder.
Ableton Live is a DAW (digital audio workstation) that has an effective workflow for electronic music. For my drum’n’bass, breakbeat electronic, it works just fine. Live has no built-in microtonal scale support, and the piano roll is always locked to a 12-note Halberstadt layout, which can be tricky.
It’s possible to make microtonal music in Ableton Live by using VST instruments or Max 4 Live instruments with microtuning support built in. As far as Ableton knows, MIDI data goes into these instruments and audio comes out. It’s up to the instruments themselves to provide the new tunings and scales that I use in my music.
I use a couple of Max 4 Live instruments that I made myself, plus several VSTi: Xen-Arts FMTS2, IVOR, XenFont, TAL-Sampler, u-he ACE and Garritan Personal Orchestra 4. All of these plugins have full keyboard tuning support, which is why I choose to use them. To tune up, they each require you to import a tuning file. I’ll elaborate on that later.
Before writing a piece, it works well to have an idea already of the tuning you want to use. Scala can be used to invent musical tunings or specify an old one. I have written about how to invent your own scales with Scala, described other superbly expressive tunings that already exist, and hand-selected some interesting scales to download.
Once I have a scale in Scala that bends my ear in just the right way, it must be exported as a tuning file for it to be usable in those VST instruments. The common formats are:
I wrote a guide to exporting .tun files, and the process is much the same for producing MIDI tuning dumps and .txt tuning files.
(If you’re a Max/MSP or Max 4 Live user, I also wrote a guide to microtuning your patches with the coll object, and microtuning using expr).
After I have some tuning files to work with I’ll load them up in one of my synths, and jam away until I play something I really like. I don’t go too deep in to the theory of it all; I leave that up to others. Using your ear and finding sounds you like is a good way to go.
I like to record sounds on location with my H4n portable recorder. After recording I keep the audio in my personal sound library until I’m ready to use them in a project.
I almost never use the preset sounds on my synths. It’s best to patch in your own sound designs because that becomes a recognisable part of your craft. It’s well worth practicing this skill for yourself. Some days I do nothing but come up with new sound designs with my fave synths. That way I can save them in my personal library and use them only when inspiration strikes.
The AXiS-49 is a hexagonal keyboard controller, and it’s best suited to exploring microtonal scales because it makes fingering really easy. Imagine trying to play a 15-note scale on a standard keyboard where the pattern repeats after every 12 notes… The fingering gets totally perplexing and that gets in the way of creativity. With the AXiS that’s no problem at all. The AXiS also greatly increases my reach, so I can play large chords easily.
The difficulty I find with the AXiS is that I use so many different tunings that it’s difficult to build up a muscle memory for any of them. And the buttons are so close together that I make mistakes quite easily.
It comes in handy to have a standard keyboard at times. I was given a 2 octave MIDI controller with some knobs on it which I can map to various functions in my DAW. Using this to recording automation in real-time is one way to breathe some life into a static synthesised part.
I mix and master in Ableton Live, then publish on my Bandcamp, YouTube and Soundcloud pages. Which you should definitely check out.