You are browsing the Tutorials category
With the recent release of Scale Workshop 2, lead developer Lumi Pakkanen has started producing video tutorials to demonstrate what this tuning application can do. Learning some Scale Workshop basics will aid you in your study of musical tunings. The first two videos are below. For the rest, you’ll have to follow Lumi’s youtube channel.
This tutorial demonstrates the on screen keyboards where you can play microtonal scales in your browser.

This tutorial will answer a lot of questions about how you can enter your own scales from numerical values.
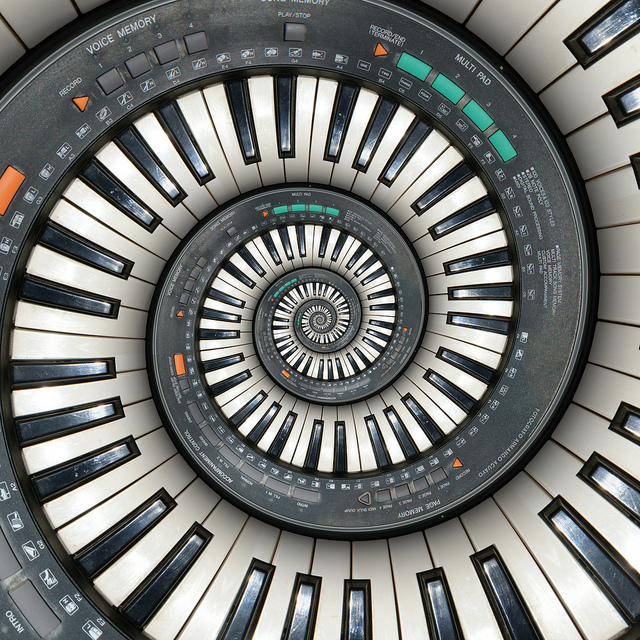
Since Bitwig Studio is a pretty good DAW for making microtonal music, you might find yourself working with a musical scale that contains more or less than 12 notes. Particularly if you’re working with a large scale, you will want the piano roll to visually reflect what you’re hearing. You might have thought this was not currently possible in Bitwig Studio but I have found the quick workaround for you. All you need is to watch the tutorial video below and then spend a few minutes setting up your custom piano roll.
The tutorial music is Yeah Groove from my very recent album Morphable, in 26 tone equal temperament.
In discussion of musical tuning there is often talk about “equal divisions” of an octave or other interval. There is potential here for confusion as there are two different ways of equally dividing an octave.
Wait, two ways? You’d think there was only one way to divide an octave equally. You make all the notes the same size! But I’m being serious. You can equally divide an interval either arithmetically or logarithmically.
Arithmetically equal = each step is the same Hz difference from the next
Logarithmically equal = each step is the same ratio difference from the next
Let’s say you have two notes, A 440Hz and A’ 880Hz. The interval between these two notes is an octave. If I want to divide this octave into arithmetically equal notes then we simply split it in a way that the difference in frequencies are equal.
For example we could split it into 8 intervals. We get the difference between the two notes by subtracting the frequencies. 880 – 440 = 440. Then divide this into 8. 440 / 8 = 55. So the base step size is 55Hz.
Constructing the scale is done by starting from 440Hz and then adding 55Hz each time until we reach the octave at 880Hz:
| 440Hz | 495Hz | 550Hz | 605Hz | 660Hz | 715Hz | 770Hz | 825Hz | 880Hz | |||||||||
|---|---|---|---|---|---|---|---|---|---|---|---|---|---|---|---|---|---|
| 55Hz | 55Hz | 55Hz | 55Hz | 55Hz | 55Hz | 55Hz | 55Hz | ||||||||||
| 9/8 | 10/9 | 11/10 | 12/11 | 13/12 | 14/13 | 15/14 | 16/15 | ||||||||||
Each note is 55 Hz apart from the next. You can move up and down the scale by adding/subtracting 55 Hz. The result is the harmonic series segment 8:9:10:11:12:13:14:15:16 with a fundamental frequency of 55 Hz. This scale sounds nothing at all like the equal tempered scale, in fact it sounds similar to the scales you get by playing harmonics on a guitar string.
To hear what it sounds like, you can follow this Scale Workshop link – it will open a page where you can press qwerty keys to play in this tuning.
Let’s take the octave from A 440Hz to A’ 880Hz and look at it as a ratio. 880/440. This can be simplified to 2/1.
To divide 2/1 into 12 logarithmically equal steps we need to find the step size. 2/11/12 = 1.05946309436 (approx).
Constructing the scale is done by starting from 440 Hz and then multiplying this value by the step size 1.05946309436 twelve times until we reach 880 Hz:
| 440Hz | 466.16Hz | 493.88Hz | 523.25Hz | 554.37Hz | 587.33Hz | 622.25Hz | 659.25Hz | 698.46Hz | 739.99Hz | 783.99Hz | 830.61Hz | 880Hz | |||||||||||||
|---|---|---|---|---|---|---|---|---|---|---|---|---|---|---|---|---|---|---|---|---|---|---|---|---|---|
| 26.16Hz | 27.72Hz | 29.37Hz | 31.12Hz | 32.96Hz | 34.92Hz | 37Hz | 39.21Hz | 41.53Hz | 44Hz | 46.62Hz | 49.39Hz | ||||||||||||||
| 1.059 | 1.059 | 1.059 | 1.059 | 1.059 | 1.059 | 1.059 | 1.059 | 1.059 | 1.059 | 1.059 | 1.059 | ||||||||||||||
These steps don’t look equal in terms of frequency – the Hz values get larger with every step. Maybe by now you have noticed one way in which the steps are equal… Each step is an equal ratio difference from the next.
To hear what it sounds like (I mean it’s just 12edo at A440Hz), you can follow this Scale Workshop link – it will open a page where you can press qwerty keys to play in this tuning.
In an equal temperament, you can modulate between keys and every key will sound equally in-tune. Whereas arithmetic divisions will only give you perfectly-tuned harmonics of a single fundamental with no concept of tonal modulation.
Which of these two methods sound equal to the ear?
It’s the logarithmic version – also known as equal temperament or EDO (equal division of the octave).
When tuning theory people mention “equal” scales, safely assume that they’re probably talking about this method.
Equal temperaments sound equal because our perception of pitch is logarithmic itself. The hearing system isn’t listening out for equal difference in Hz, it’s listening out for equal difference in step size ratio. This isn’t immediately obvious until you’ve compared the two for yourself.
So this was just a quick and simple post to explain something that has caused a little confusion in the past. Hope someone will find it useful.
If you are looking for a quick introduction to microtonal scales in computer music, then I invite you to watch my latest tutorial video.
Using Microtones in Electronic Music explains how to tune software synths to microtonal scales, for composition and production using a DAW-based workflow.
Microtonal music is a deep topic, and this tutorial video is just one possible starting point. If you know of alternative approaches then please do share your knowledge with others!
0:00 Intro
0:30 What software
2:00 Tuning up
2:35 5edo
4:37 Messing around with 19edo
14:40 19edo semaphore[9]
18:19 A golden ratio inspired tuning
27:00 Some chords of 22edo
32:07 How a song like Gleam looks on piano roll
This article explains some software and hardware I used to write a few of my albums. The workstation runs Linux, Bitwig Studio and various audio plugins. I also cover many alternative software choices here as your preferences might differ to mine. Updated 2023.
[The old article about my previous workflow for making microtonal music with Ableton Live is still available though quite out of date as Ableton have improved their microtonal support in recent years.]

You could probably get away with using a few year old laptop for sure. I have some kind of Intel Core i7 and 16GB DDR4 RAM.
If you want to record in from microphones or hardware synths then you’ll also want to get an audio interface. I just got a cheap one that said it was USB class compliant. 2 ins, 2 outs.
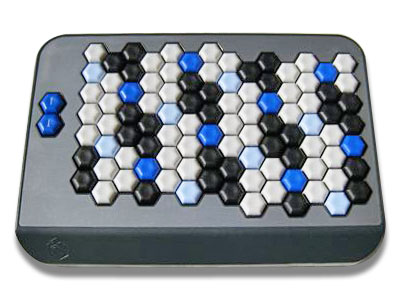
USB MIDI keyboards seemed to universally work for me on Linux. Isomorphic keyboards such as my C-Thru AXiS-49 work well for microtonal music because scale and chord fingerings remain the same in each key, whereas a standard MIDI keyboard requires you to learn a different fingering for each key. The keys are all nerdy lil hexagons, it’s cute. It just plugs in via USB and my system recognises it instantly as a MIDI input device.
I bought a second hand M-Audio Keystation 88es for 50 quid. Good deals can be had if you buy used. It’s my preferred MIDI controller; I even prefer it over the AXiS-49! There’s something about the traditional 1-D style keyboard that feels natural to play.
Which Linux distribution is a personal preference and I can’t hope to do the question justice. To replicate my setup you want any Debian-based distro so you can use the KXStudio repository (more about the KXStudio suite of tools later).
The distro I’m using is KDE Neon which is based on Ubuntu. I find KDE Plasma to be familiar, fast, with possibly too many options for customisation. Of course audio software demands that your desktop environment be as lightweight as possible. XFCE and MATE are two other lightweight and popular desktop environments worth trying.
If you just want sane defaults for audio work then Ubuntu Studio gives you get the low latency kernel and other audio tweaks set up by default. Think they have PipeWire now and of course KDE so I’m thinking to switch to Ubuntu Studio next time I nuke and pave.
For Arch-based distros, the AUR has an impressive selection of audio software.
I’ve been using KXStudio applications to deal with audio on my Linux music workstation. There are quite a few tools in KXStudio so here are the ones I find especially useful:
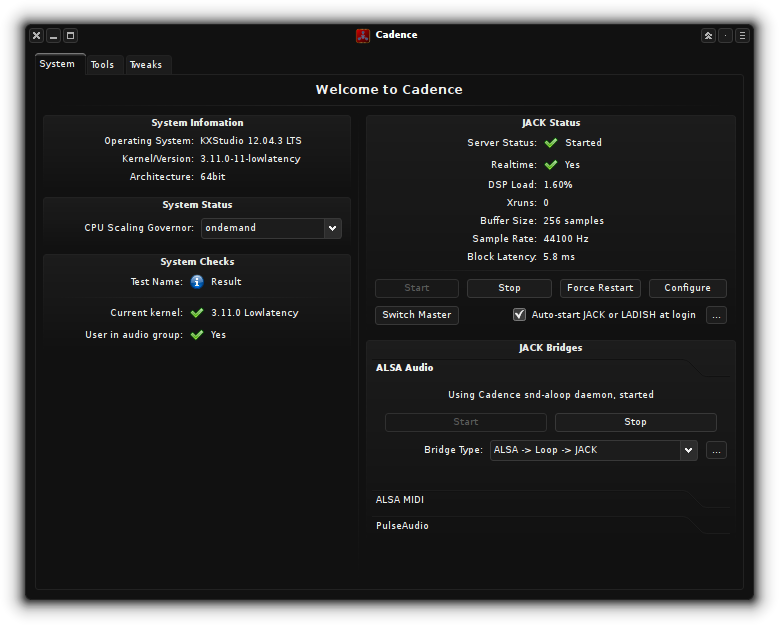
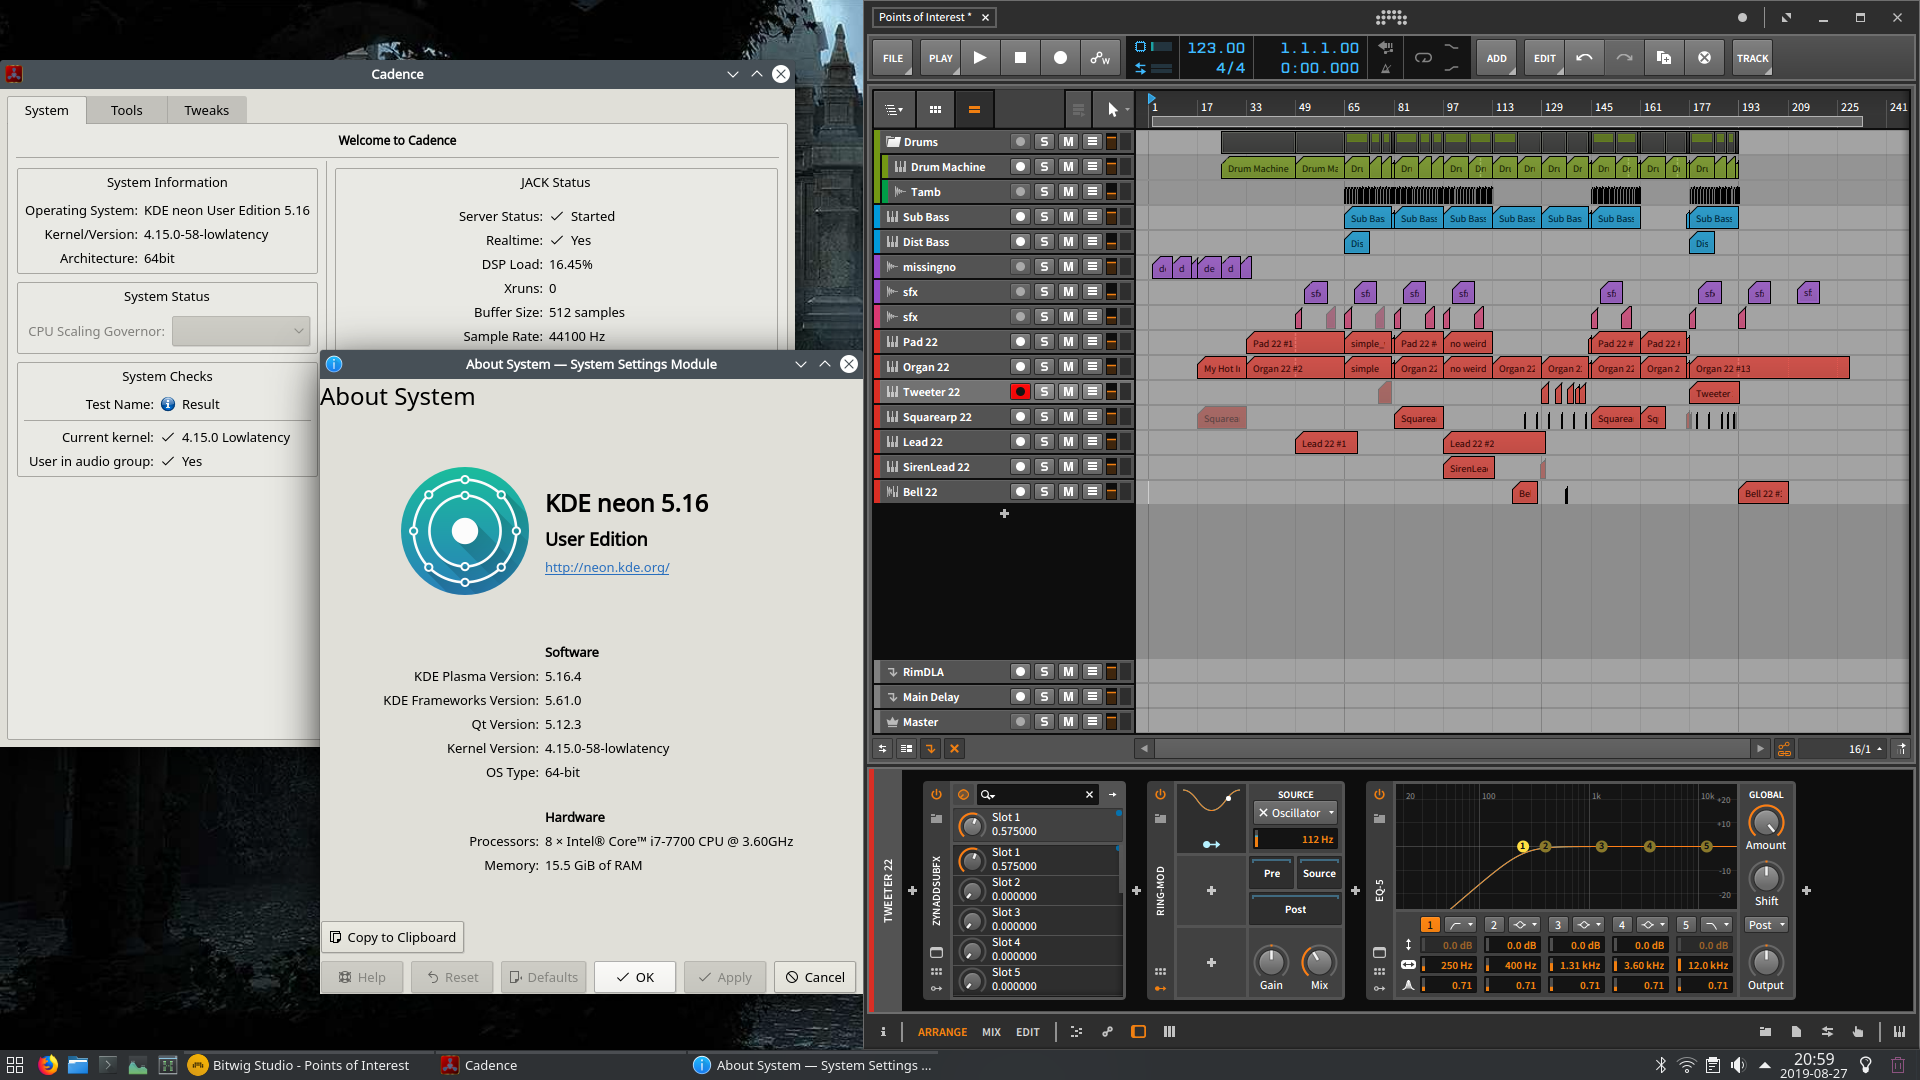
Cadence is a set of tools for audio production all in one application. It performs system checks, manages JACK, calls other tools and make system tweaks. It launches automatically when I boot, so I can then launch my DAW and get straight to doing music.
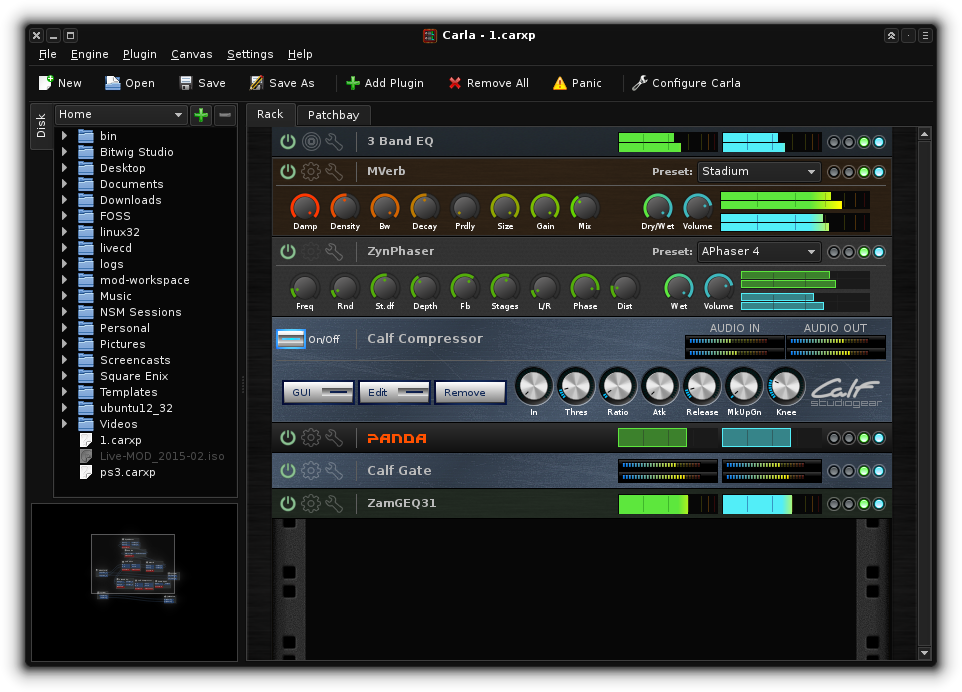
Carla is a plugin host that can load up various Linux synths and effects. There’s even a way to load Windows VSTs with it but I haven’t taken the time to figure that out – I’m happy with Linux-native software currently. The reason Carla is so crucial for me is that it can be loaded not just as a standalone app but also as a Linux VST. This is extremely useful if your DAW only supports VST plugins but you want to use LV2 plugins too – Carla acts as a VST-LV2 bridge in this case.
You can install the KXStudio apps by first setting up the KXStudio repo in your package manager. The repo also contains a large number of music plugins so you can install them via your package manager rather than compiling manually. This is so useful! It even contains all the u-he Linux synths (you still need to pay for a license as they are proprietary) and Zyn-Fusion (the new interface for ZynAddSubFX)!
When doing any kind of real-time audio processing or recording, you’ll want to use the low latency kernel rather than the generic kernel. This may help prevent crackling and reduce your system’s audio I/O latency. If you’re using a distro that is designed for audio work such as Ubuntu Studio then you already have this kernel. Otherwise if you’re using a generic distro you should search online for how to install and use the low latency Linux kernel.
You should also add your user to the audio group. This gives your Linux user permission to use desktop audio devices.
These days I’m using Bitwig Studio as my DAW. I will explain why below and also mention a few alternatives.
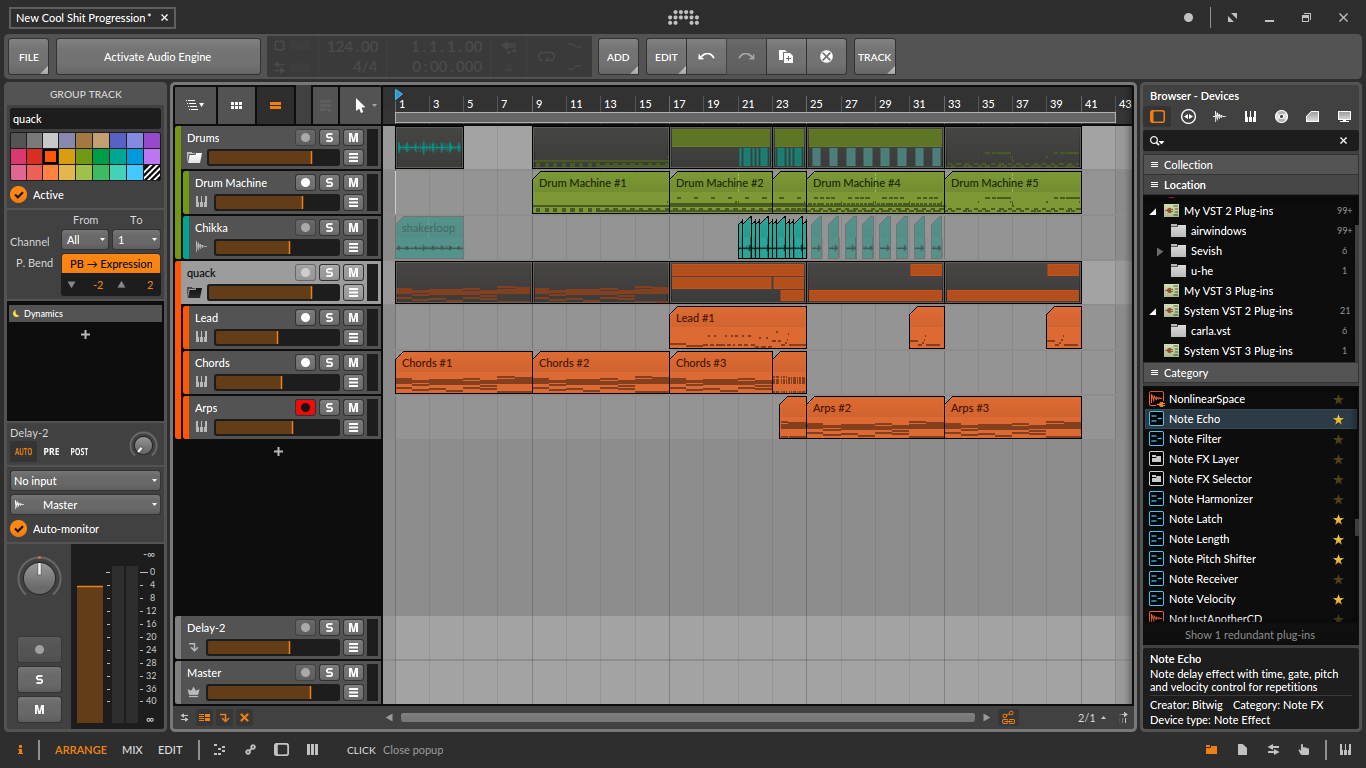
As a former Ableton user I found it easy to switch over to Bitwig Studio. Bitwig has a native Linux version which works well with the apps I installed from KXStudio. It is not free software – you buy a license and then get 1 year of upgrades. You can continue to use your copy after the license expires but you don’t get feature updates until you redo the license.
Bitwig Studio supports Linux VST plugins, but note that it does not support Linux LV2 plugins. This is disappointing because many libre audio plugins use the LV2 standard and not VST. And this is why the Carla plugin host is so essential – it allows me to bridge LV2 plugins into Bitwig Studio!

Bitwig’s built-in synths support MPE polyphonic pitch-bend. Its piano roll allows you to detune each note individually using an intuitive interface. That does entail a lot of manual work but gives you unprecedented pitch control in a polyphonic setting. MPE is also quite future proof being that it’s part of the MIDI 2.0 spec. I’m waiting to see if future synths will work seamlessly with Bitwig’s implementation of polyphonic pitch-bend.
Some people will prefer using Bitwig’s polyphonic pitch-bend over my usual approach (which is to use plugins that can import tuning files – more on that further below)!
There are various alternatives to Bitwig Studio and I’ll mention a few below.

Ardour is one of the most widely used free-and-open-source DAWs for Linux. Supports MIDI and synth plugins, so you can use plugins to get microtones.
Reaper – I am told by many many people that it is simply the best DAW around. Its native Linux build is stable enough for serious use. The license is cheaper than most proprietary DAWs and the demo version gives full access to all features, including saving and loading projects, so you can try it fully before committing to support the devs.
Reaper also lets you customise the key colours and layout of the piano roll. This is one of those issues that only microtonalists seem to understand is useful!
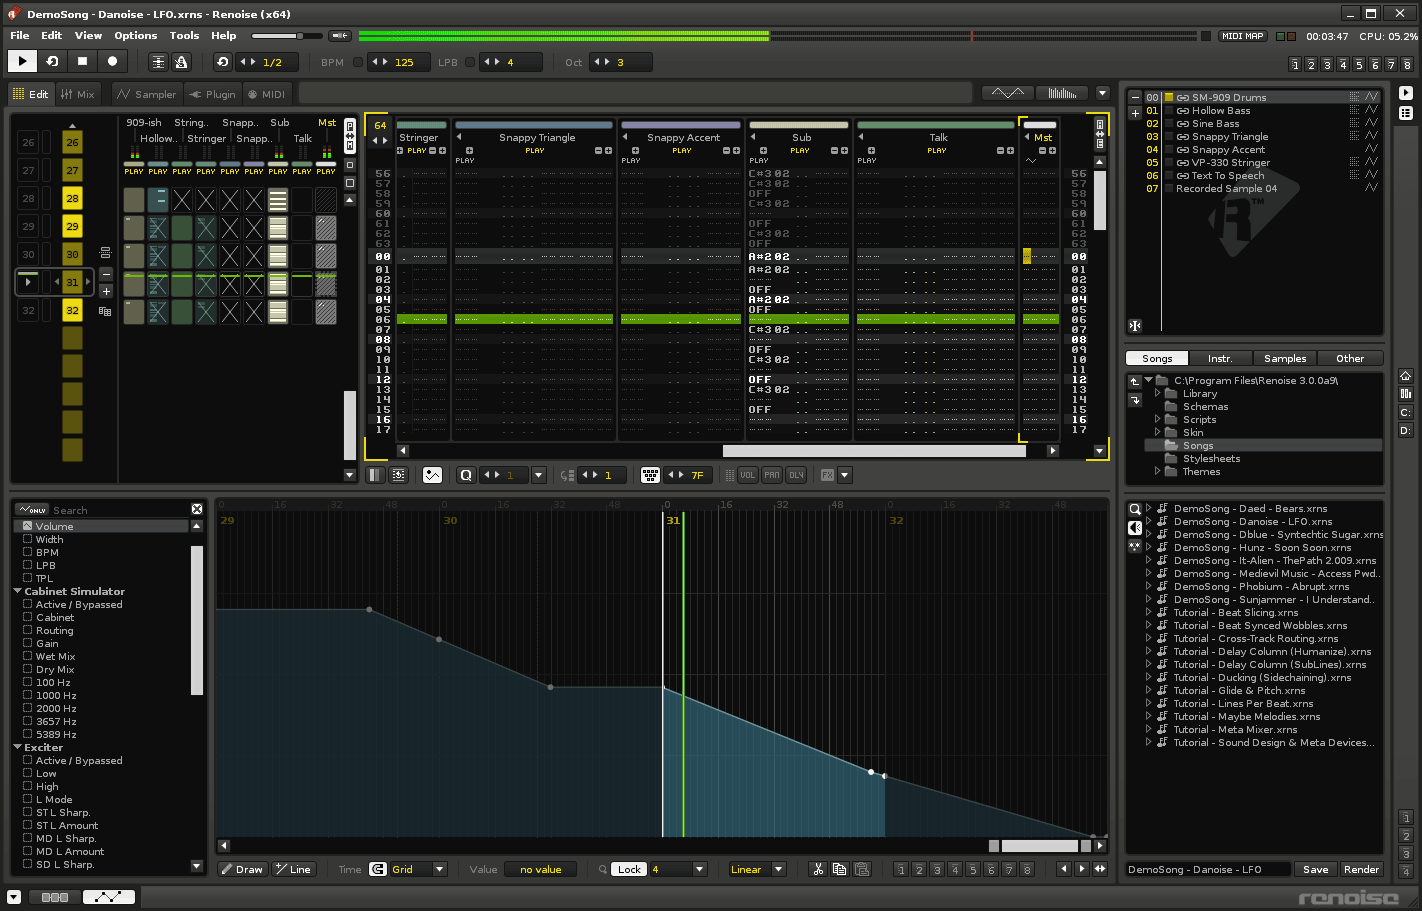
Renoise is a tracker style DAW that runs natively on Linux and can be microtuned using the SCL to XRNI tool. It also supports plugins so you can get at those microtones that way.
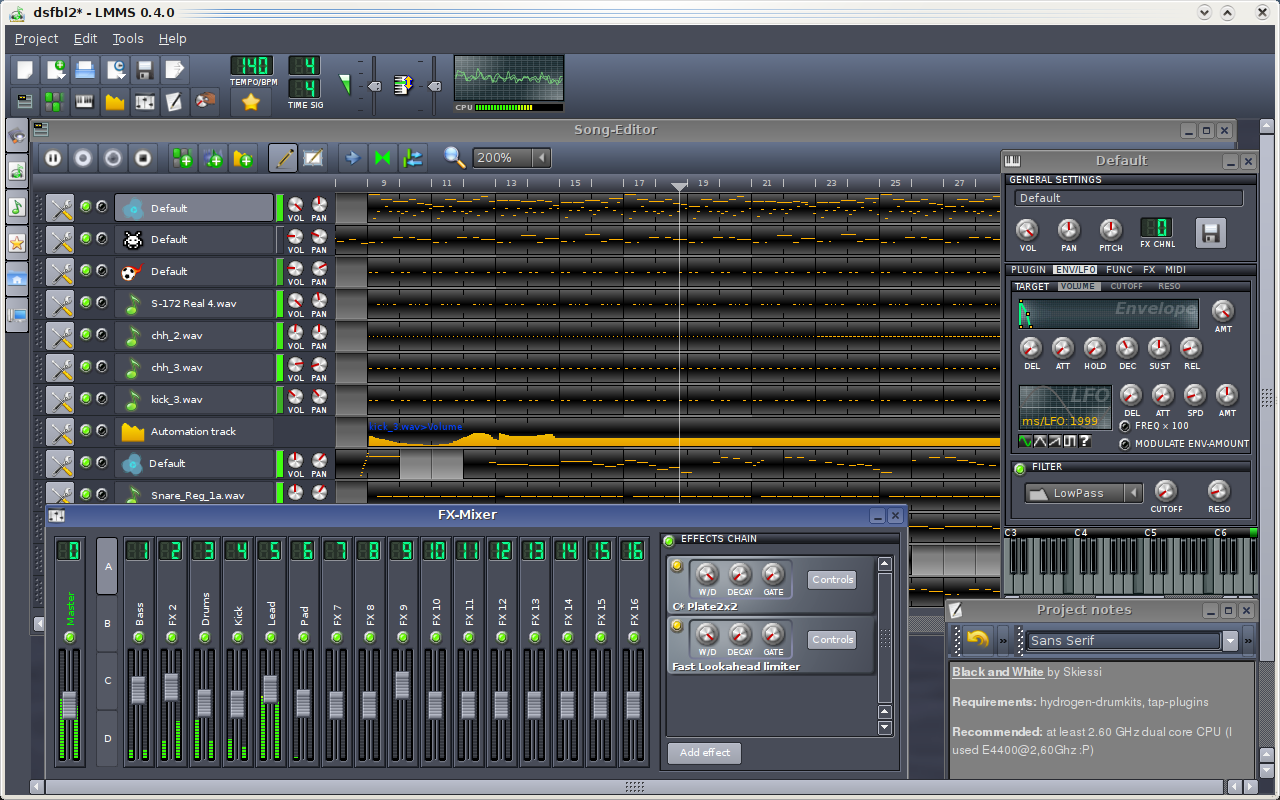
LMMS comes bundled with a variety of synths, all of which support microtuning by default.
Many synths don’t support microtonal tunings (they are locked in to 12-tone equal temperament) so we’re only looking at synths that support custom tunings. Often times the synths that come bundled with your DAW don’t support it but there are exceptions, try it and see.
If you use synth plugins that have built-in microtonal support then it doesn’t matter which DAW you use, as long as your DAW supports plugins. Below is a showcase of Linux-native plugins with support for microtonal tunings.
Surge XT is a powerful open-source synth with an excellent implementation of microtonal tuning via .scl and .kbm files. It’s cross-platform and can run as an LV2 or VST plugin. You can also use it with VCV rack.
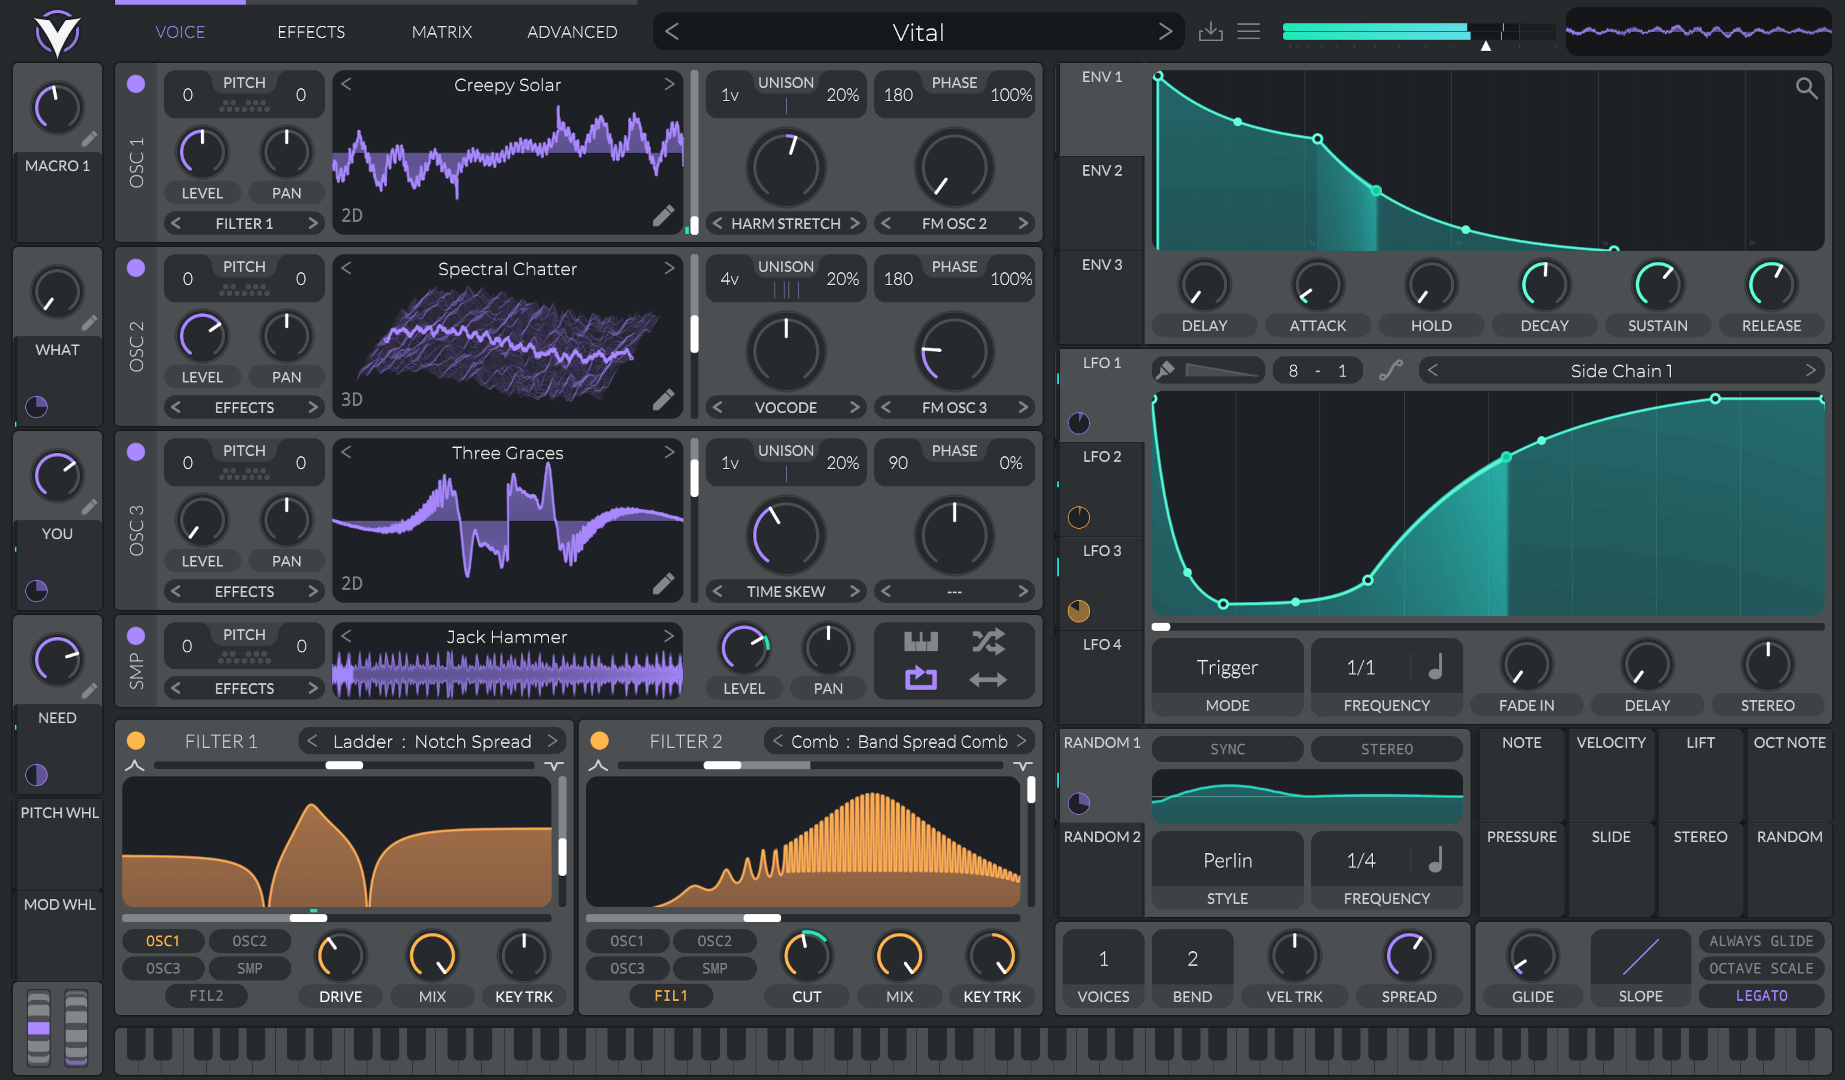
Vital is a wavetable synth which supports microtonal tuning via .tun or .scl/.kbm files. There is a free version and a paid version and I believe the source code has also now been released.

TAL-Sampler is my sampler plugin of choice because it’s fun to play, not overly complicated and supports microtuning by tun file, MTS-ESP or MPE. That’s three ways to choose to get at those tunings!
The great people at TAL now support Linux for all their plugins which is extremely welcome because I was using them before I switched over. The sampler is especially important because there aren’t many of those supporting Linux. But I also get a lot of use from TAL-Chorus-LX, TAL-DUB-X and TAL-DAC.
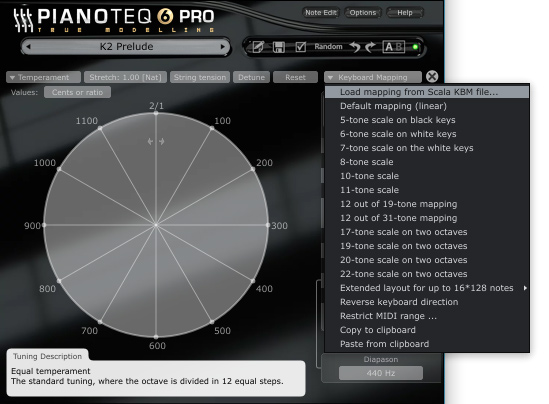
Modartt’s Pianoteq is well known in the music world for its rather good piano sound. It’s a physically-modelled piano – this has some benefits over sample-based pianos. First, it has a tiny footprint of just a few megabytes storage, as opposed to the gigs and gigs often required by sample-based pianos. Second, you can tweak the parameters of the physical model to get interesting variants on the typical piano sound. Here’s an example that will interest microtonalists: you could design a piano with quietened even harmonics (e.g. harmonics 2, 4, 6, etc.) so that the timbre will blend better with the Bohlen-Pierce scale (this scale features primarily odd harmonics). This kind of sound design possibility is pure excitement for nerds like me.
Pianoteq is a good example of how developers should implement Scala files support. It supports .scl files but also the .kbm format that allows the user to create any specific full-keyboard microtuning. Additionally they provide a tone circle graphic that allows you to visualise how the overtones of the piano timbre align with your tuning. That’s not necessary to have, but is a really nice feature.
Tip: on the tuning screen you usually must enable the ‘Full Rebuild’ option otherwise a great many tunings will sound unnatural and un-piano-like.
MTS-ESP is also supported as a method of microtuning, but last time I checked it had some sound quality issues. I’m recommending Scala files instead if you want to tune it.
Pianoteq supports Linux, macOS and Windows natively so it’s a good plugin for almost anybody who wants to write microtonal piano music. Just note that the Stage version has no microtonal support; you’ll need to get the Standard or Pro version if you want to retune the piano.
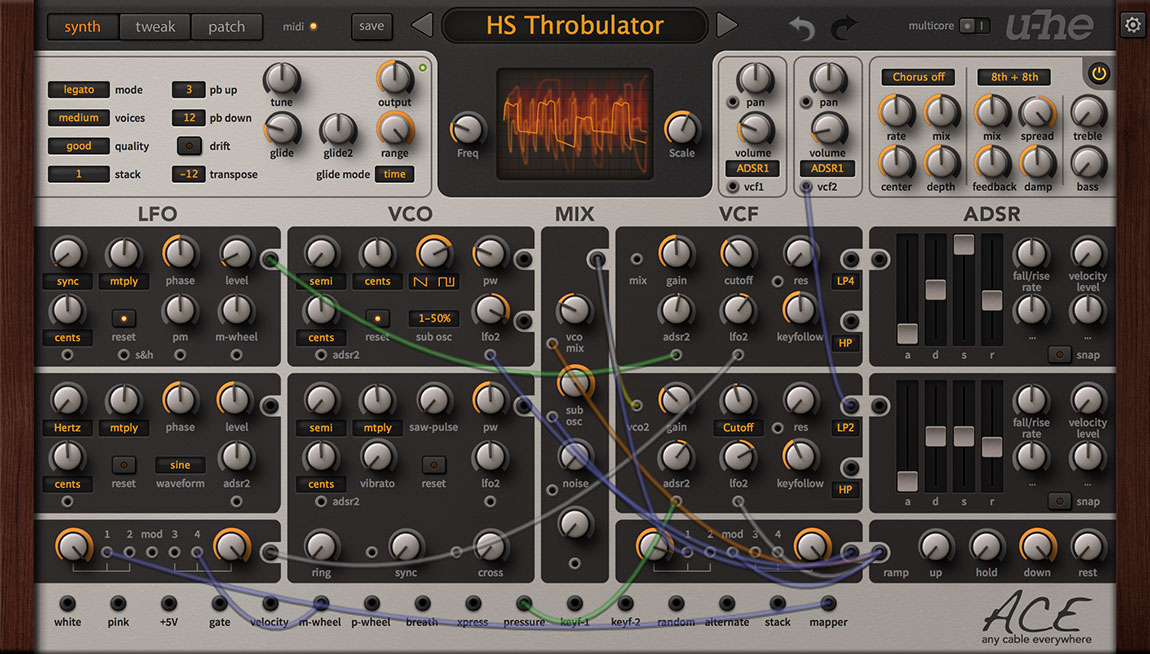

ACE – virtual semi-modular synthesizer
Bazille – virtual modular synthesizer
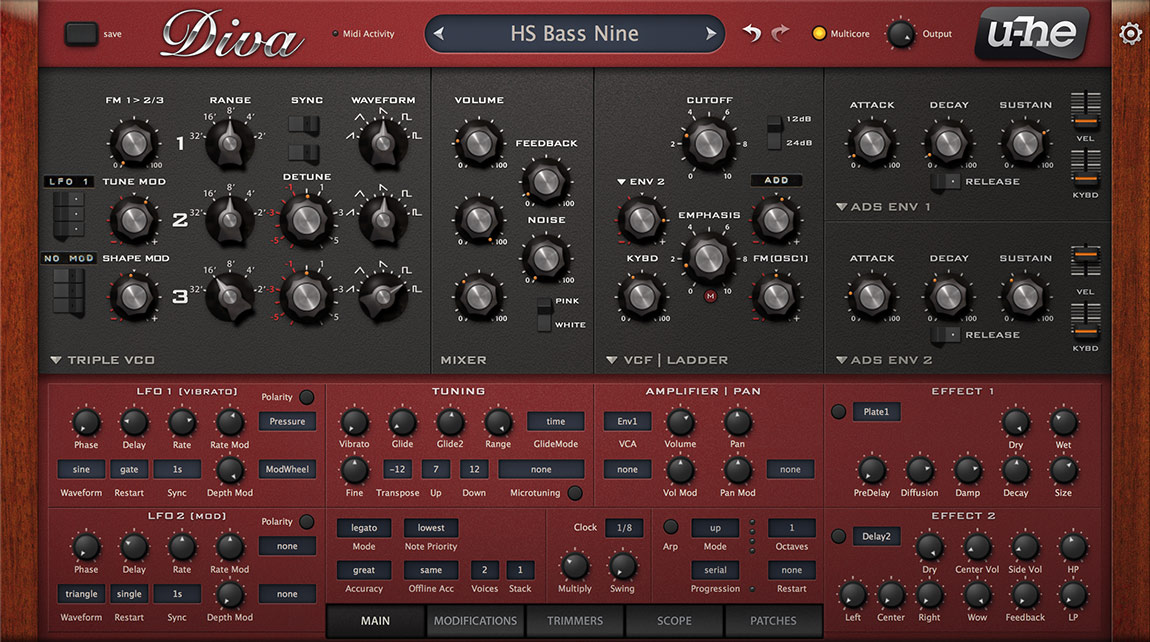
Diva – virtual analog synthesizer
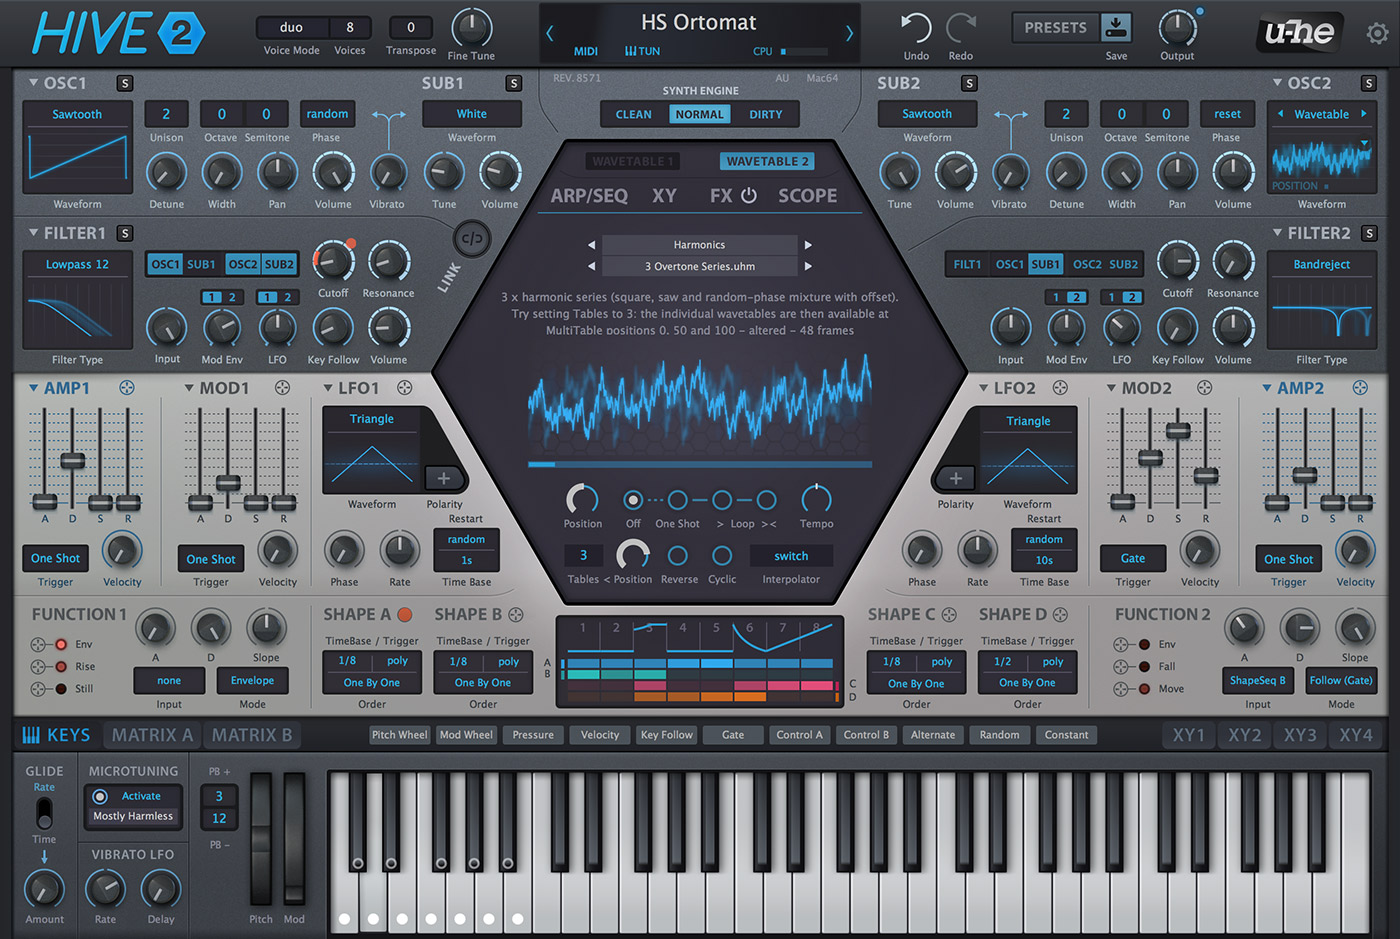
Hive2 – wavetable synthesizer
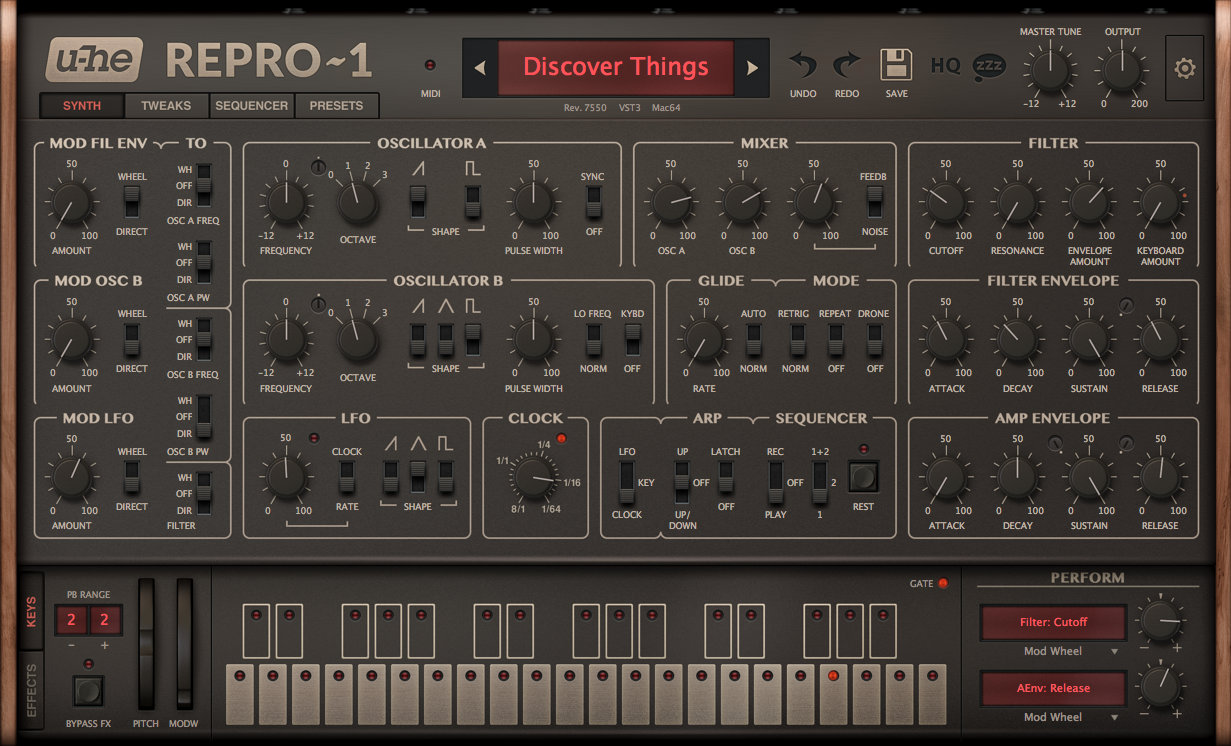
Repro – virtual analog synthesizer
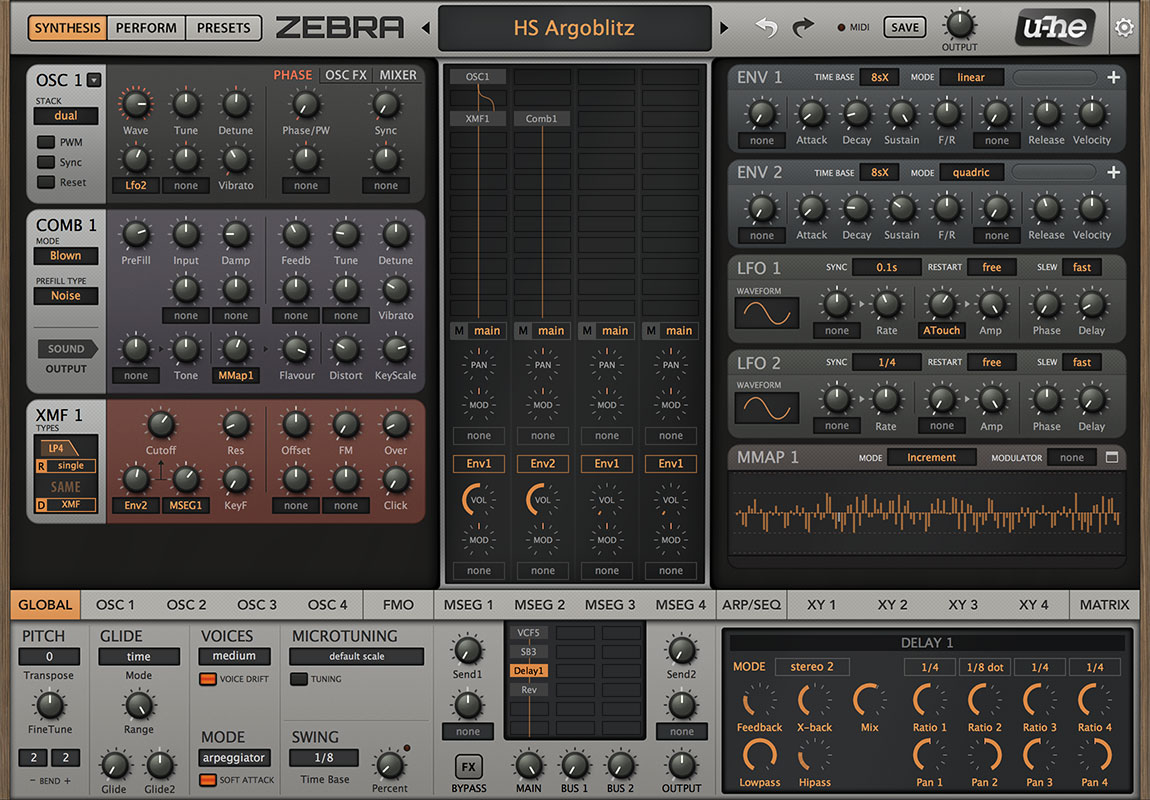
Zebra2 – various synthesizer
Many of the u-he synths have Linux versions available and can be microtuned using .tun file import.
Please be aware the Linux versions of our plug-ins are still considered beta. While the plug-ins are stable, we are not able to provide the same level of support for these products as we do for the macOS and Windows versions. Support is provided via the Linux and u-he communities on our forum.
I have a license for ACE and was using it on Windows for a few years. It’s nice to know that I can continue using it on my new setup.

EP MK1 is a free, physically-modeled electric piano plugin by Mike Moreno Audio. It has two methods for microtuning – you can dial in any equal temperament you want via the interface or you can load a text file containing a list of frequencies. The text file can be easily generated by Scale Workshop (I’m not sure if any other tuning software supports Pure Data text files).
I think EP MK1’s electric piano simulation is actually pretty usable within a mix. And with the recent addition of support for Pure Data text files it’s possible to tune every MIDI note to an arbitrary frequency. I finally have good reason to use this plugin on my next album.
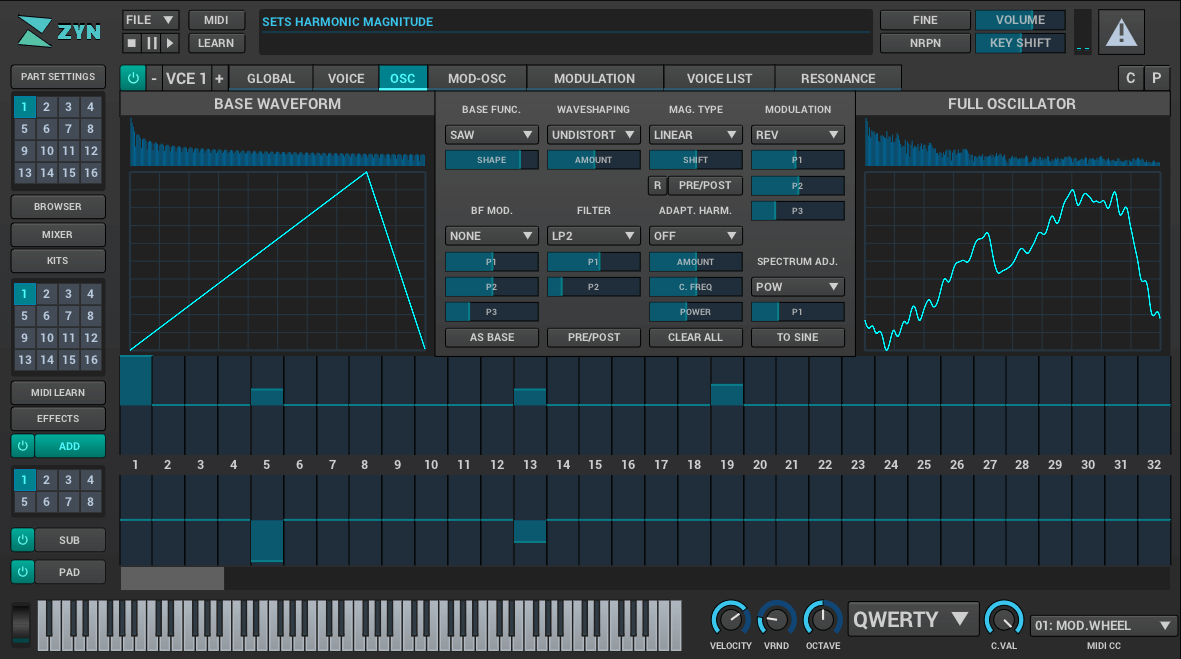
Zyn-Fusion is a powerful synth capable of additive, subtractive, FM and PM synthesis. Really though you want this because its thick PADsynth sound can’t be imitated elsewhere. Zyn-Fusion can be microtuned by importing Scala (.scl) files and keymap (.kbm) files. Alternatively you can enter tuning data directly via the UI which might be helpful to some. While the developer of the new UI put so much effort into it, I feel like Zyn-Fusion still bugs out a lot and has rough edges. So I don’t really recommend this synth plugin anymore but it’s worthy of mention.
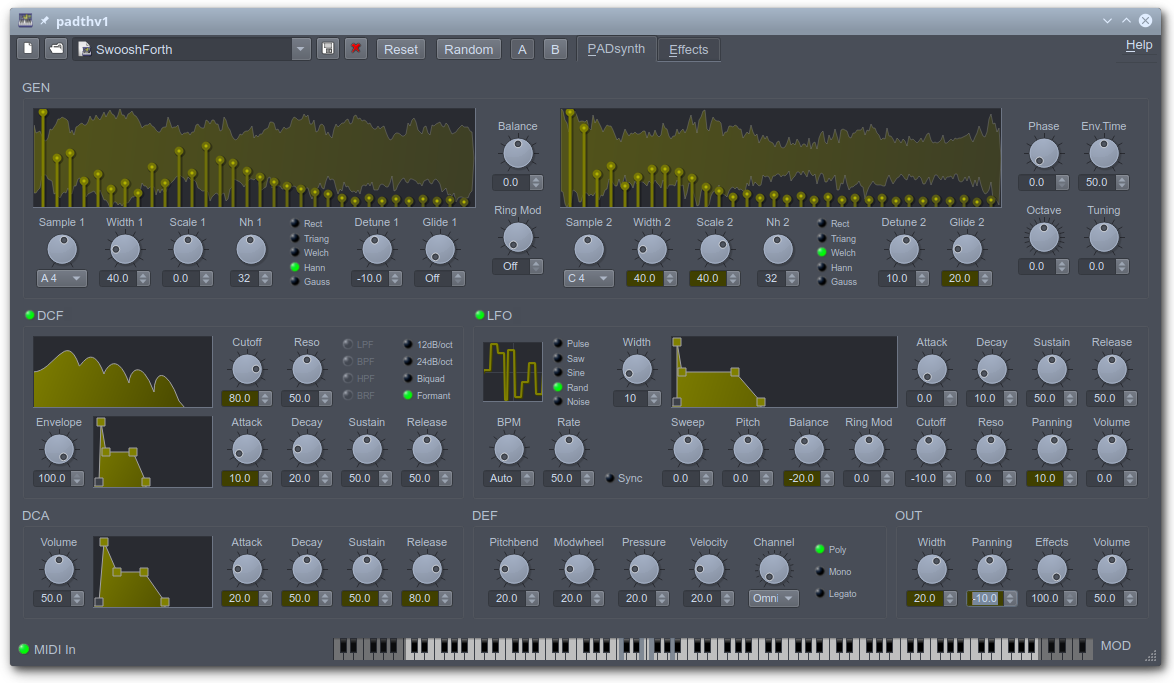
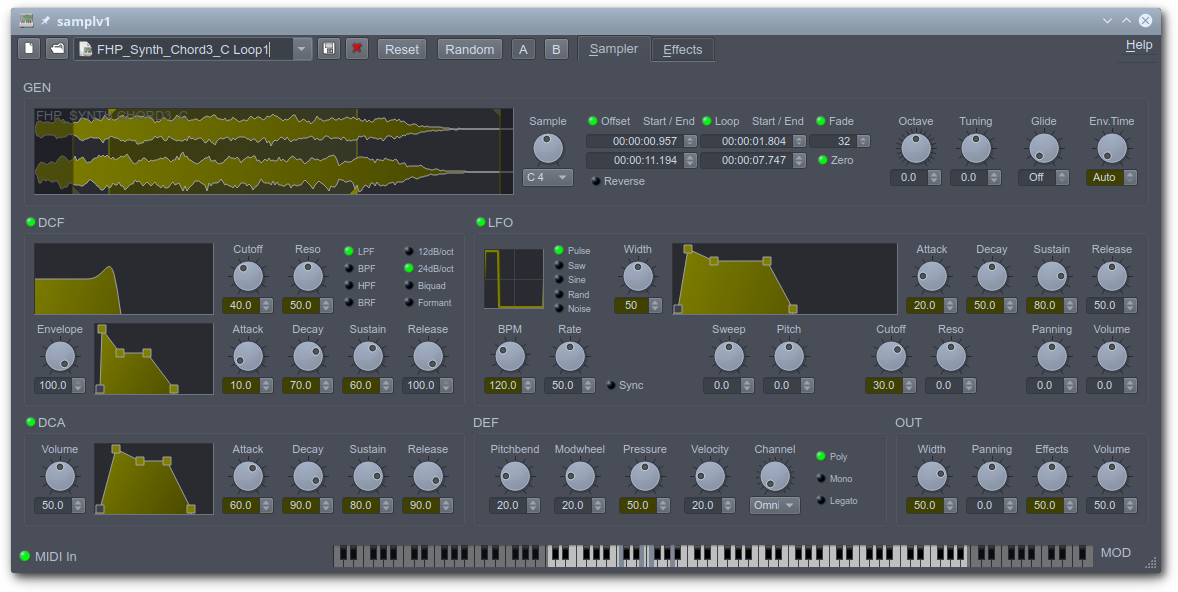
The v1 plugins (except for drumkv1) all support microtuning via .scl file.

synthv1 – a subtractive synth
samplv1 – a polyphonic sampler
padthv1 – an additive synth based on Paul Nasca’s PADsynth algorithm
As far as I’m aware samplv1 is the only microtonal-capable sampler plugin for Linux, so you will want to grab this!
kbm files are supported which means these synths can do full-keyboard microtuning. Your tuning can be saved per-instance or optionally saved as a system setting (in case you want to always use the same microtonal tuning in every instance).
This same developer also created the Qtractor DAW for Linux.

Amsynth is a subtractive synth and it’s quite easy to use.
Pure Data is a visual programming environment for audio similar to Max/MSP. It is free and very powerful.
Camomile is a VST wrapper for Pure Data patches. In other words, it allows you to turn your Pd creations into VSTs that you can load in to your DAW! It is cross-platform, so your creations can run on Linux, macOS and Windows.
The combination of Pure Data and Camomile is comparable to Max 4 Live.
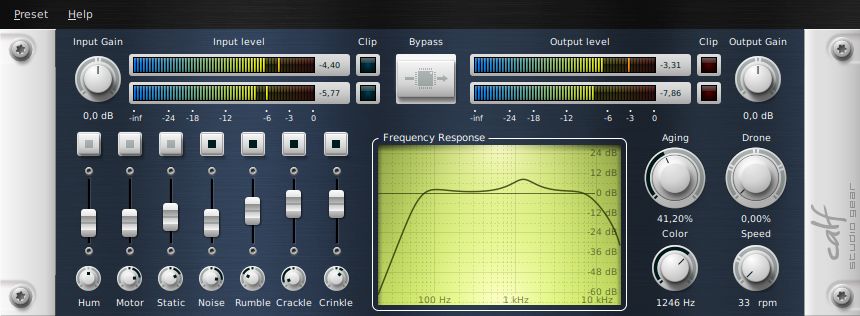
Vinyl by Calf Audio is a vinyl emulation audio effect. So what, you ask. Well, it has one useful feature called ‘drone’ which applies an oscillating pitch-drifting to whatever audio you feed into it. If you dial in a lot of ‘drone’ you can recreate that warbly lo-fi tape-wow sound, or if you use just a little you can add a subtle intonation drift that will add interest to an otherwise perfectly accurate digital synth sound. Those of you who have composed just intonation music using digital synths will know the buzzing periodicity/phase-locking kinda sound. Just a little ‘drone’ adds enough error to the intonation to prevent that buzzing from happening.
Most synths don’t provide any interface for customising your own microtonal scales – instead they load a tuning file that you have to create yourself. For that, you’ll need some special software.
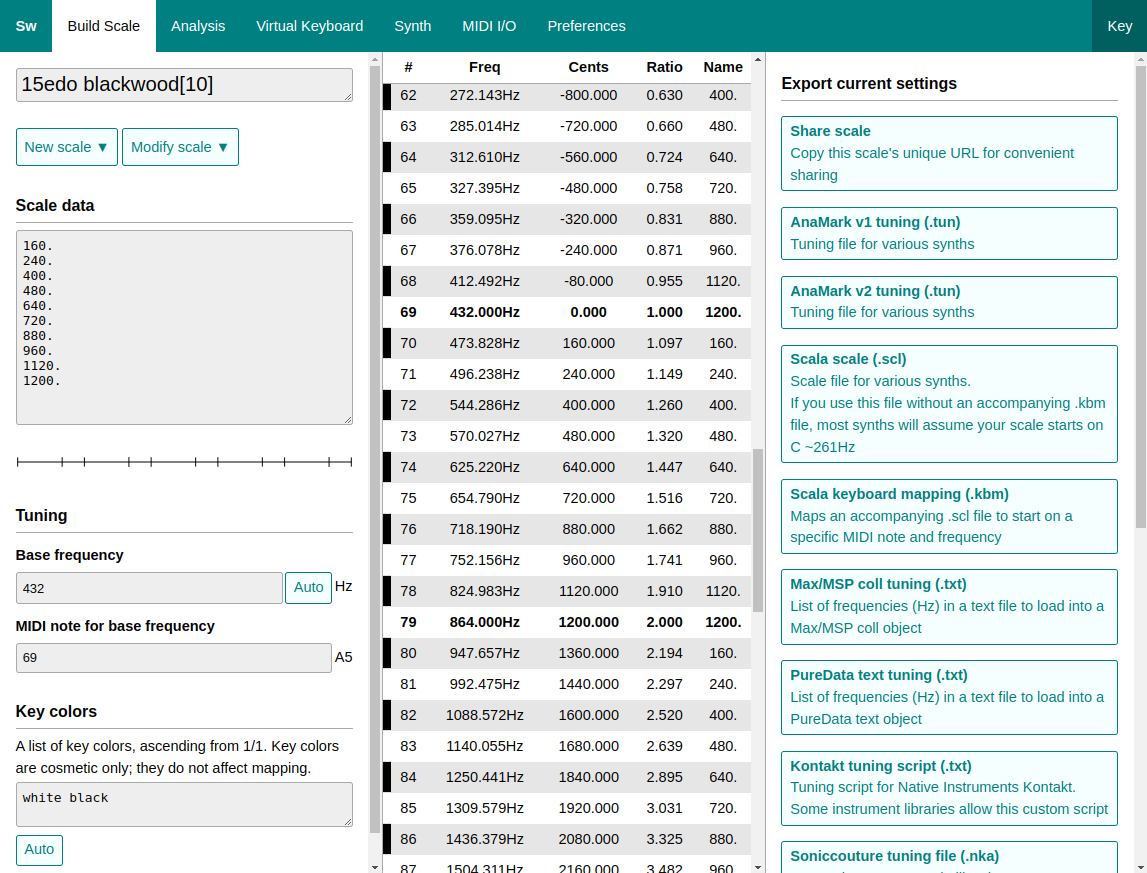
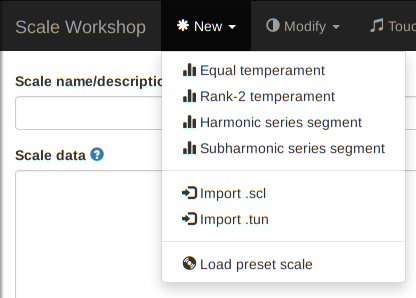
If you’re just getting started, try Scale Workshop – it can generate microtonal scales and export to a variety of tuning file formats. It’s free and open-source (MIT license). Because it runs in your web browser it doesn’t require installation.
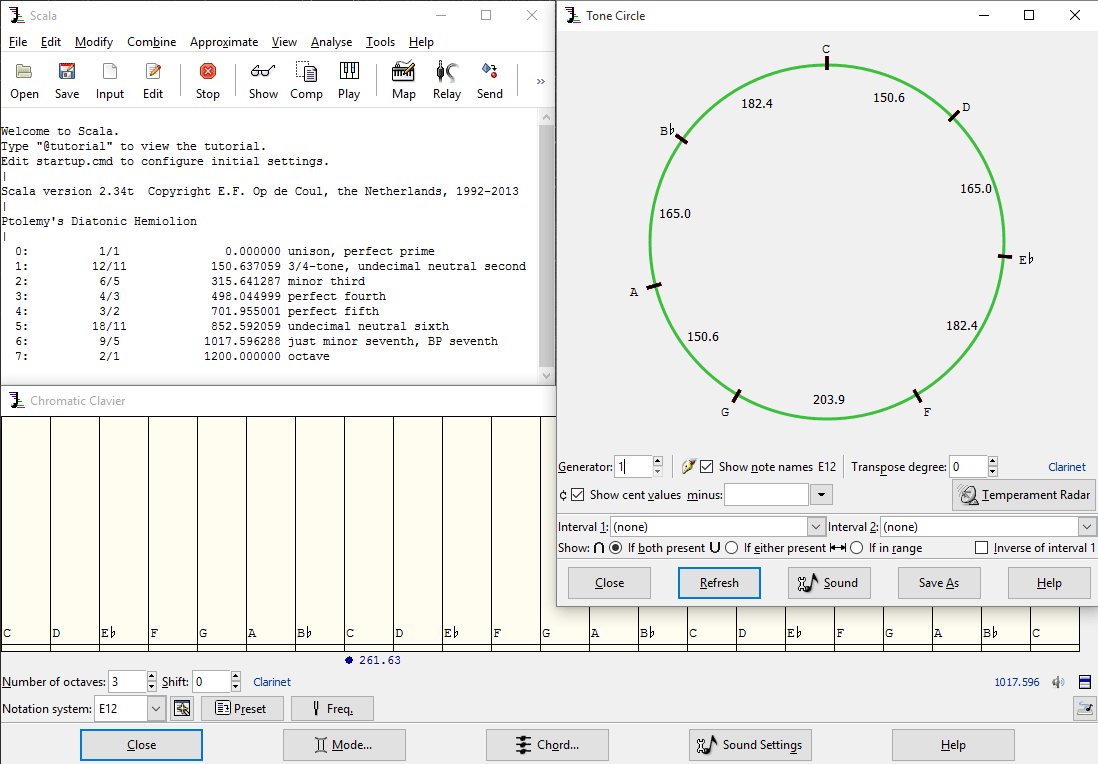
For serious experimenters, you might want to graduate from Scale Workshop and use Scala. It’s also free, and can be installed by following the instructions on their official website. It’s not as user friendly as the alternatives but it has about ten thousand cool features hidden away.
If you want to re-tune hardware synths or use MIDI Tuning Standard then you will want to get Scala and not Scale Workshop!
This is the important bit!! Once you have created a tuning file using Scala or Scale Workshop, simply load it up in your synth of choice. Read your synth’s user manual for how to do this. Now you can jam away in your chosen microtuning.
As of 2023 I have released 5 albums that were produced on this Linux-based setup. So I’m serious when I say I prefer this OS and it hasn’t held me back as an electronic musician. If you’re curious about my sounds then head to sevish.com and hit play.
Are you making music on Linux, or making any kind of microtonal music? Let me know in the comments what works for you and how you got it running! Everybody has a different workflow and we can all learn something from one another.
My first experience with Linux was Fedora Core 3 in the early 2000s. It was neat but I wanted to play Stepmania and Rollercoaster Tycoon so I stuck with Windows. Later I got into music production. Again, Windows stuck. The spell was broken by Windows 10 which is literally so bad. I got back into Linux and saw how much it had matured. That’s when I committed to it.
(I do use macOS at work which is pretty good but this too is riddled with bugs and awkward design decisions).
The swap over to Linux was a gradual process as I had to learn a few things but I think I ended up with a solid system. Whenever I boot up the old Windows machine to revisit old projects I am quickly reminded how often I used to tolerate crashes on Ableton+Windows.
One issue remains with Linux that many audio software developers still target only Windows and macOS. I see this trend slowly reversing – and I have so much appreciation for developers who add support for native Linux. Have supported a few of these devs myself by purchasing their tools and sending in detailed bug reports when needed. Big respect to you all.
What you’re referring to as Linux, is in fact, GNU/Linux, or as I’ve recently taken to calling it, GNU plus Linux plus KDE plus JACK plus Bitwig Studio plus Carla plus Scale Workshop plus Surge XT.
Hey microtonal gang. If you want to convert an AnaMark tun file to Scala scl (or other tuning format), here’s how you can do it using the Scale Workshop online microtuner.
Go to https://sevish.com/scaleworkshop
Click New > Import .tun
Select any .tun file from your computer.
Click Export > Download Scala scale (.scl)
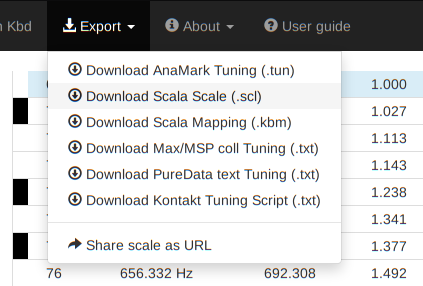
Save the .scl file to your computer. Finish.
The above method also works in reverse – you can convert a .scl scale file to a .tun file.
The Export menu gives a few other options, such as Kontakt tuning script, Max/MSP coll frequency list, or PureData text frequency list.
Scala .scl files do not preserve the base MIDI note nor base frequency. If you find that your converted .scl file isn’t in the same key as your original .tun file, then make sure you also export the Scala Mapping (.kbm) file. A .scl and .kbm used together should be in the same key as the original .tun file you imported into Scale Workshop. A .scl file used alone will assume note 1/1 is on MIDI note 60 (middle C) at 261.63 Hz. When you export a .tun file, it already contains the base MIDI note and frequency within it, so there’s no need to export a .kbm alongside the .tun.
Are your exported files not working as expected? Windows and macOS/Linux files work slightly differently. Click General settings and make sure your correct OS is chosen under Line endings format.

Read the Scale Workshop User Guide if you want to learn how to use this software to make microtonal scales.
A new web app called Scale Workshop allows you to design and play your own microtonal scales. You can also tune various other synthesizers with it. It has just reached version 1.0 and is now recommended for use by the wider musician community.
Scale Workshop has these aims in mind:
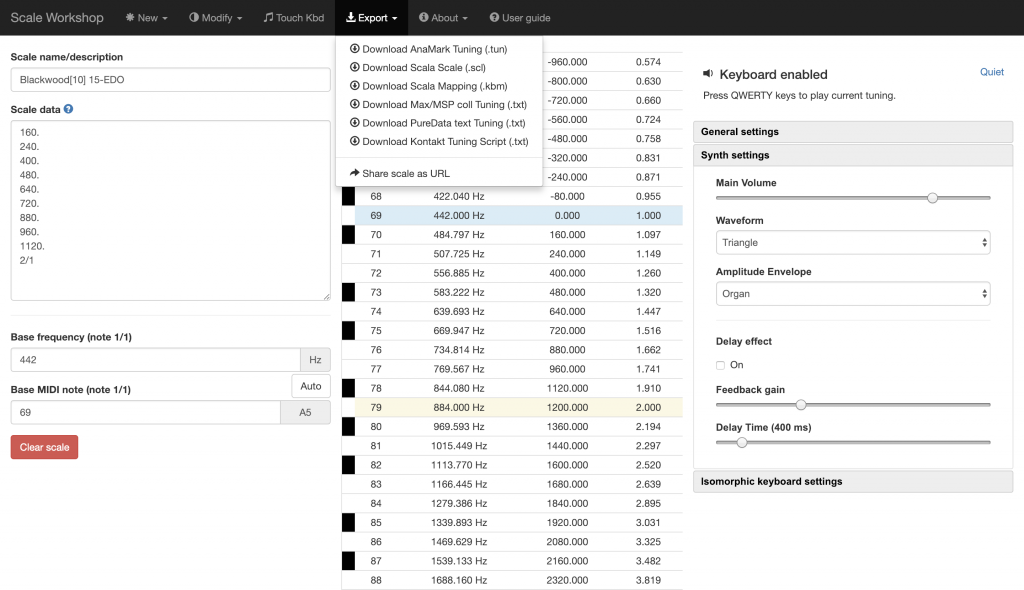
Scale Workshop puts a polyphonic synth right inside your browser. You can audition and perform your scales by playing with a connected MIDI controller, QWERTY keyboard, or by using the touch-screen overlay.
Convert scl files and convert tun files to various tuning formats. Export formats include Scala .scl/.kbm, AnaMark TUN, Native Instruments Kontakt tuning script, Max/MSP coll text format and Pure Data text format.
Share your scales with other people by copy-and-pasting the URL in your address bar while working on your scale. The recipient will instantly see your scale information and can play it using their keyboard. This is invaluable for communicating your tuning ideas with others, or allowing your musical collaborators to export your tuning in whatever format they prefer. Try it out.
Display frequencies, cents and decimal values for your tuning across all 128 MIDI notes.
Note that this list is incomplete.
This has been a labour of love for almost 2 years – I hope that many people will find it useful! If you want to share any work you’ve created with Scale Workshop then I’d love to hear about it.
Now that Scale Workshop is in a stable state, I am going to focus my attention back on composing new music and hosting the Now&Xen microtonal podcast.
Open Scale Workshop in a new window
I’m always keen to see how other musicians are creating microtonal music and the ideas behind their craft. For a few years now I have been building a YouTube playlist of microtonal music tutorials and explanations. As the playlist now has over 140 videos, it’s a good time to share these hours of content with others.
One thing that makes microtonality fascinating is that the newcomers are exploring new tonal structures that even the old masters haven’t heard of. But new or old, when a musician shares their insight in a video, I include it in the above playlist.
The playlist features videos from: Tolgahan Çoğulu, Adam Neely, Dolores Catherino, minutephysics, This Exists, Elaine Walker, Stephen James Taylor and others.
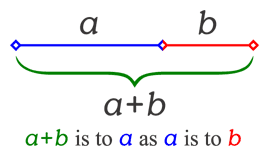
The golden ratio, also known as φ (phi) or approximately 1.618, is a number with some trippy properties. It’s no wonder that many people treat the golden ratio with a great deal of mysticism, because (here’s the cliche part) it appears repeatedly in nature and also crops up in many fields of mathematics. And we all know that mathematics is the language of the universe. Duuude.
So I want to talk a little about the golden ratio and how it might sound if we used it as a musical interval.
You may have seen or heard some youtube videos which exclaim “this is what the golden ratio sounds like!!” — These are almost always based on the decimal expansion of phi, where each digit is assigned to a note of the major scale. I won’t give an example here because it’s such an unimaginative Western-centric interpretation of nature’s finest ratio. Just imagine the background music for a shitty Google commercial, children and mothers playing, young trendy people smiling while looking into their laptops, and you get the idea.
Let’s have none of this. The truth is that the golden ratio, as a musical interval, is gritty, dirty, dissonant, inharmonic, and not remotely like you’d expect. And it’s explicitly microtonal.
Take for example John Chowning’s Stria, an important electronic work from 1977, using his then-new discovery of FM synthesis. The golden ratio is used as the interval between carrier and modulator, such that the resulting timbre is an inharmonic cloud of golden-ratio-related partials. To get a sense of what the golden ratio may sound like as a musical interval, start from here and let the sounds slowly work their way into your brain.
Here is something that causes confusion time and time again. There are two musical intervals which both claim to be the golden ratio! How is this possible?
Consider the octave in terms of cents. Cents are a musical measurement of pitch which divide the octave into 1200 logarithmically equal parts. This means that 200 cents is equivalent to an equal-tempered whole tone, 100 cents is equivalent to a semitone, 50 cents is equivalent to a quartertone, etc. So our first version of phi will simply divide 1200 by phi:
1200 / φ = 741.6407865 cents
~741 cents sounds like a horribly sharp fifth. Well, we already know that the golden ratio sounds dissonant, so this could be the golden ratio that we’re looking for. But first let’s look at the other contender:
1200 * log2(φ) = 833.090296357
While both of these intervals could be used to generate scales that you could play interesting music with, only one of them gives me that one-with-the-universe vibe. To find out why, we need to look at a psychoacoustic effect known as combination tones.

It is a simple fact of psychoacoustics that any two tones that you play will produce additional combination tones. There are two types of combination tone: difference tone and sum tone. The sum tone is calculated by summing the frequencies of the two tones. The difference tone is calculated by subtracting the frequency of one tone from the other.
Let’s play A (440Hz) and E (660Hz) on the keyboard and work out these combination tones for ourselves.
Difference tone = 660Hz - 440Hz = 220Hz

Sum tone = 660Hz + 440Hz = 1100Hz
The difference tone sits an octave below the root note of A. This is the reason why you hear the missing fundamental being “filled in” by your brain when you play a power chord or a just major triad.
As for the sum tone, it is tuned to the 5th harmonic above that missing fundamental of 220Hz, because 220Hz*5=1100Hz. The 5th harmonic is a just major third plus two octaves. The sum tone is perhaps one of the reasons why the just major triad is such a stable and pleasing sonority.
Just to recap: If I play TWO tones (440Hz and 660Hz), your brain hears FOUR tones, (220Hz, 440Hz, 660Hz, 1100Hz). The effect is subtle, and the combination tones are heard a lot more softly than the real tones, but the effect can be perceived. Bearing that in mind, let’s work out the combination tones that appear when using the golden ratio interval.
We shall play a 1kHz tone and a ~1.618kHz tone. The interval between these two tones is the golden ratio of ~833 cents.
Difference tone = ~1.618kHz - 1kHz = ~0.618kHz

Sum tone = 1kHz + ~1.618kHz = ~2.618kHz
What’s interesting about these combination tones is that they are themselves related to the original tones by the golden ratio. This is easy to demonstrate:
1kHz / ~0.618kHz = φ

~2.618kHz / ~1.618kHz = φ
All four of these tones are related by the golden ratio! If we calculate the 2nd order combination tones, 3rd order, and so on, we’ll find the same thing again and again. Every combination tone is connected to some other tone by the golden ratio. This is exactly the recursion effect that we expect to find when we use the golden ratio properly.
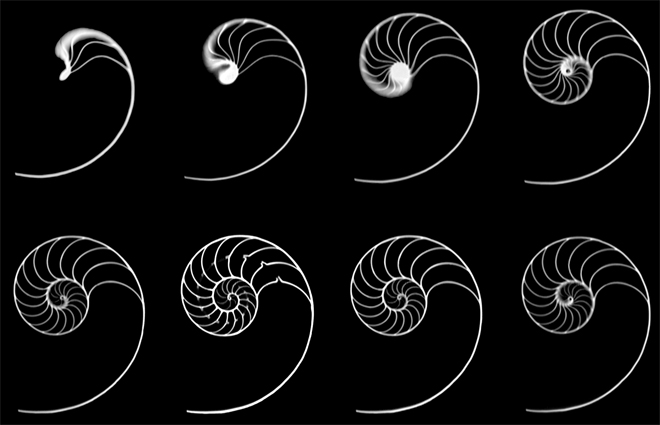
However this landscape of recursive inharmonic partials can best be described as a chaotic and complex mess. This is an extreme contrast to the use of the golden ratio in visual proportions, paintings, architecture, flowers and nautilus shells, which most people would agree appear harmonious and pleasing. But that’s just the truth of it. The ear works in weird ways. Not all visual forms have an analogue as sound.
By now it should be clear that golden ratio music has some interesting properties that the Western equal-tempered scale could scarcely hope to reproduce. If you have some highly accurate micro-tunable instruments and perhaps some scale-designing software such as Scala, alt-tuner or LMSO, then your next step is to design a scale that features the golden ratio.
There are many possibilities when making your own phi-based scale, but today I will only give you one. Developing your own golden ratio scales is left to you as a rainy day exercise.
Almost all scales contain an interval of equivalence, and for most scales that interval is the octave. In octave-based systems, a note such as C appears many times, and each C is separated by one or more octaves.
By the way, an octave is a ratio of 2. If you play an A at 440Hz and then play the A’ one octave higher, the higher pitched note would be 880Hz.
For our scale, we want to pack in as many golden ratios as possible. There’s no room for any boring numbers such as 2. Indeed, our interval of equivalence will be the golden ratio itself. This means the scale will repeat after approximately 833 cents. This scale would fit snugly into the frequency space between 1kHz and ~1.618kHz.
Our next step is to divide this interval into smaller intervals (a & b). Each time we divide an interval into two intervals, those intervals should have the golden proportions.
Then take the biggest interval that remains in the scale and break that down into 2 intervals with the golden proportion. Repeat this process until you have enough pitch material to write music with.
I’ve done all the calculations, and the resulting scale (taken to 8 steps) is presented below in Scala format so that you may try it out for yourself:
! sevish_golden.scl
!
Scale based on the golden ratio
 8
!
 121.546236174916
 196.665941335636
 318.212177510552
 439.758413685468
 514.878118846189
 636.424355021105
 711.544060181825
 833.090296356741
Some interesting notes about the above scale… When generating the values, I noticed that the scale was a Moment of Symmetry (MOS) after 3, 5, 8 steps. Those are Fibonacci numbers. I stopped after 8 steps because it will map very nicely to a piano keyboard with linear mapping. With this mapping, you will always hear the golden ratio when you play a minor sixth on the keyboard. Coincidentally, this tuning has some fair approximations to the fifth, fourth, supermajor third, minor third, and major second.
If you want to find more tunings with the golden ratio, you might look at Heinz Bohlen’s 833 cent scale for inspiration.
When using scales that are based on the golden ratio, you will find that timbre makes a huge difference to the result. If you use an instrument that produces bright and clear harmonic overtones such as the violin or a sawtooth wave, you will hear an unruly clash of a harmonic timbre against an inharmonic scale.
Instead, you could take a similar approach to John Chowning and bake the golden ratio right into the timbre itself by using inharmonic overtones based on the golden ratio. Then suddenly your timbres and your scale will align, resulting in a much smoother sound. It’s just one more demonstration of the fact that tuning and timbre are deeply intertwined.
If you’re a computer musician, download a free copy of the Xen-Arts synth plugins. These instruments can produce inharmonic partials which can be controlled by the user. By default, they include a setting where each partial is tuned to some multiple of the golden ratio. These instruments could be a quick way to explore the topics I’ve been discussing in this post.
I recently wrote a tutorial about how to change the root note of your microtonal scale, where I used Scala’s Edit Mapping dialog. There is so much more I want to say about keyboard mappings. This time I’m explaining how to map various microtonal tunings on to a standard MIDI keyboard in a sensible way.
Needless to say, this topic is important for musicians who want to use microtonal tunings on their standard MIDI keyboard controller. I’ll be using Scala for this tutorial.
This is the easy bit but still a powerful idea. Scale degrees are numbers that describe the order of notes in a scale. The root note of a scale is always scale degree 0, and the degree numbers increase as you go up the scale. For a 7 note scale, the scale starts on degree 0, then passes through 1-6. When we reach 7, we’re an octave up from where we started. In this case, 7 would be called the octave degree.
12-equal could also be described with scale degrees. Let’s take C to be our root note, so C = 0. The rest is as follows:
| Name | C | C# | D | D# | E | F | F# | G | G# | A | A# | B | C’ |
| Scale degree | 0 | 1 | 2 | 3 | 4 | 5 | 6 | 7 | 8 | 9 | 10 | 11 | 12 |
When we’re working with large scales, notating by scale degree becomes an efficient way of describing what notes we want to play. We will also use scale degrees to tell Scala how to map notes to a keyboard.
Imagine we have an excellent microtonal 7-note scale, such as 7-EDO, mavila[7], or something else. By default, your synth maps these notes linearly and chromatically across your MIDI keyboard. Press the C key, and at the same time press the key which is 7 steps above it (that’s a G). You will hear an octave! That’s incredibly jarring, because we expect to hear an octave from C to C, not from C to G.
Linear mapping of a 7-note scale on to chromatic keys:
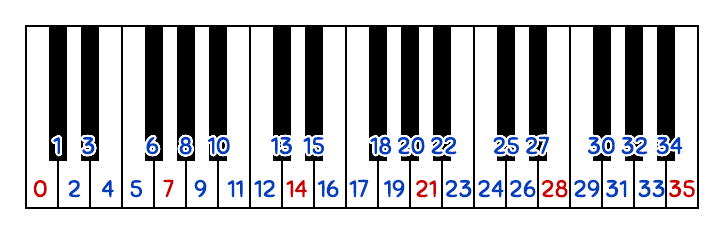
The scale degrees in red will be heard as octaves. Not fifths!
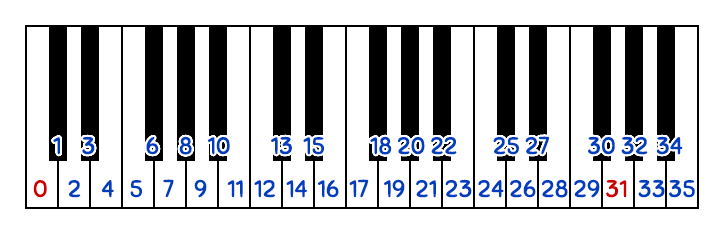
Custom mappings help to make a regular pattern that is much more familiar and easy to navigate:

The diagrams above should make it obvious that linear mapping is a problem. With linear mapping, fingering becomes irregular as you go up and down by aural octaves. For a 7 note scale, we can simply skip out the 5 black keys to get a regular, repeating pattern.
Start off by loading a 7 note scale into Scala. I simply typed ‘equal 7’ to get 7-EDO.
Then go to Edit > Edit Mapping (Alt+P).
The mapping should repeat every 12 notes on our keyboard, so set Size to 12. Remember that’s 7 notes from our scale, plus 5 black notes we’ll skip out, totalling 12.
Set a value for Formal octave degree, which is 7 in this case.
Fill out the remaining fields as shown below:
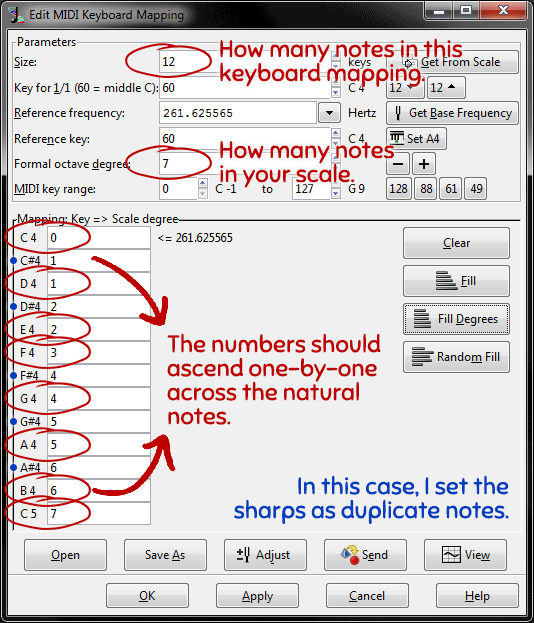
If you don’t see the fields at the bottom, make sure you enter a value for Size. Scala will then create the empty fields for you automatically, and you can type in the scale degrees that you want for your mapping.
Note that we’re skipping the sharps/blacks, so you can leave those fields blank. Or more recommended is to enter duplicate notes so you can still play the black keys to get a pentatonic subset from the scale.
Once you’re done, click Save As and save the resulting mapping file. Scala mappings are saved in .kbm format. The great thing about this, is that you can mix and match your .kbm mapping files with .scl tuning files that you have collected. So if you have several .scl tuning files with 7 notes, then you can use this same .kbm mapping file on all of them.
While you have a scale and a mapping loaded at the same time, now is a good time to export your tuning for softsynths, or relay it to hardware synths. It feels much easier to play with the new mapping.
Now imagine that we have a tuning much larger than 12 notes, and we want to select just the notes that we want to map on the keyboard. For example 31-EDO which is a meantone temperament (among other things) so it has a nice 12-note meantone scale.
Here is how 31-EDO would be linearly mapped to a keyboard:
Human hands aren’t wide enough to hit that octave so let’s just pick 12 notes for our mapping:
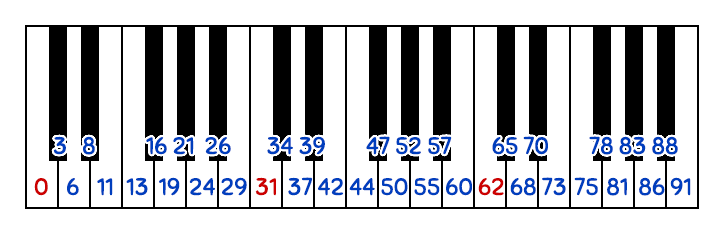
The 12 notes selected above give a chromatic scale that sounds more in-tune than 12 equal, but only in some keys while other keys can sound worse. Take some time to experiment with it and listen.
Go to Edit > Clear Mapping to reset your mapping back to normal, then go to Edit > Edit Mapping to open the keyboard mapping dialog. Fill in the Size (12) and Formal octave degree (31) then enter the scale degree for each note of the mapping.
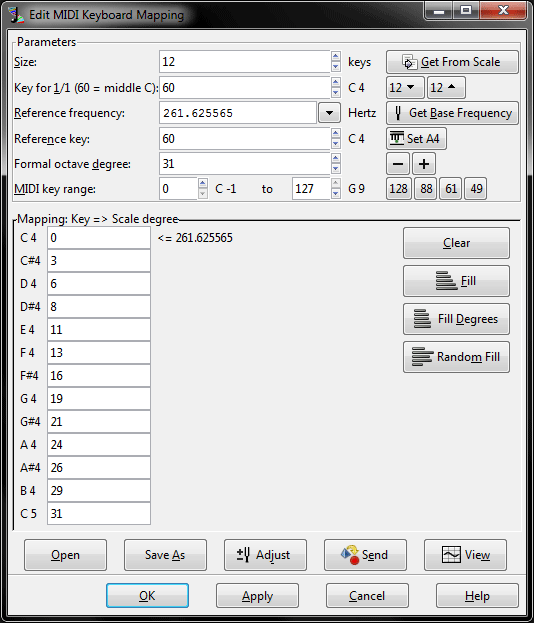
As before, now is a good time to save your .kbm mapping file, and load it up on a synth of your choice.
Instead of using Scala’s keyboard mapping functions, we could do it with the mode command instead. The mode command lets you choose a subset of notes from your currently loaded scale, and then it deletes the remaining notes.
The end result would be a single .scl file with the extra notes removed, instead of the usual .scl and .kbm pair (containing the full gamut of notes plus tuning information). You might use this method if your synth supports .scl files but not .kbm files.
Imagine that we want to recreate the above quasi-12-equal mode from 31-EDO. Just type these commands into Scala:
equal 31
mode 3 3 2 3 2 3 3 2 3 2 3 2
show
You’ll get the following output from Scala:
  0:          1/1               0.000000 unison, perfect prime
  1:        116.129 cents     116.129032
  2:        232.258 cents     232.258065
  3:        309.677 cents     309.677419
  4:        425.806 cents     425.806452
  5:        503.226 cents     503.225806
  6:        619.355 cents     619.354839
  7:        735.484 cents     735.483871
  8:        812.903 cents     812.903226
  9:        929.032 cents     929.032258
 10:       1006.452 cents    1006.451613
 11:       1122.581 cents    1122.580645
 12:          2/1            1200.000000 octave
Note that, when you use the mode command, you enter the difference (in scale degrees) between successive notes of the scale. The table below shows you how the difference between scale degrees relates to the scale degrees themselves.
| Scale degrees | 0 | 3 | 6 | 8 | 11 | 13 | 16 | 19 | 21 | 24 | 26 | 29 | 31 | |||||||||||||
| Difference | 3 | 3 | 2 | 3 | 2 | 3 | 3 | 2 | 3 | 2 | 3 | 2 | ||||||||||||||
You should also notice that 3 + 3 + 2 + 3 + 2 + 3 + 3 + 2 + 3 + 2 + 3 + 2 = 31. The sum of these digits must be equal to the octave degree, which is 31 in this case. Otherwise, the mode command will give you an error: Scale and mode size are unequal.